Sirius Platform
The Sirius Platform is FlintLab's infrastructure Platform-as-a-Service designed for mobile application testing. It unifies real and emulated devices into a hybrid Device Nexus, enabling low-latency execution, and control across devices, sessions, and concurrency.
Sirius supports seamless integration via web UI, CLI, and API, and leverages modern test-execution containers to deliver reliable, efficient, and scalable device testing infrastructure.
Key Infrastructure Components
Device Nexus
Device Nexus is FlintLab's cloud device infrastructure that unifies physical devices and emulated devices into a single, scalable, and coordinated environment.
Centralized Cloud Fabric
- Device provisioning and allocation
- Managing and scheduling device sessions
- Device monitoring and lifecycle management
Real Devices
Emulators
Simplified User Experience: Users simply choose a device from FlintLab's managed device pool, while Device Nexus handles allocation, isolation, and release automatically.
Container Nexus
A container is a lightweight, isolated environment that includes everything required to run automation tests—such as runtimes, libraries, and tools.
Advanced Execution Infrastructure
Container Nexus delivers preconfigured, scalable test-execution containers designed as ready-to-deploy templates for automated testing.These containers support different framework, tool, and runtime versions, allowing users to choose configurations that match their specific compatibility requirements.
One-Click Deployment: From the Sirius Platform, users can select a container template, choose a device from FlintLab’s device pool, and deploy the container with a single action.
Execution Modes Available in the Sirius Platform
Choose the approach that best fits your testing requirements
Sirius Secure Workspace
Recommended for automation testing. Runs tests inside a managed container connected to a device.
Ideal For
- Automation testing
- Regression testing
Sirius Device Session
Intended for manual testing. Streams a device directly to your browser for interactive testing.
Ideal For
- Manual testing & Exploratory testing
- Debugging & validation
Platform Features
Comprehensive tools and capabilities designed to streamline your testing workflow
Live Device Streaming and Control
During both automation and manual sessions, users can view the device screen live in the browser and interact with it using built-in controls.
Reports and Logs Access
For automation executions, the platform automatically captures and centralizes execution artifacts, including test reports and device-level logs.
Fast Deployment
Quick container and device setup
Secure Isolation
Protected testing environments
Usage Analytics
Track and optimize resources
Getting Started
This section helps new users quickly access the Sirius Platform and begin executing tests using devices and containers.
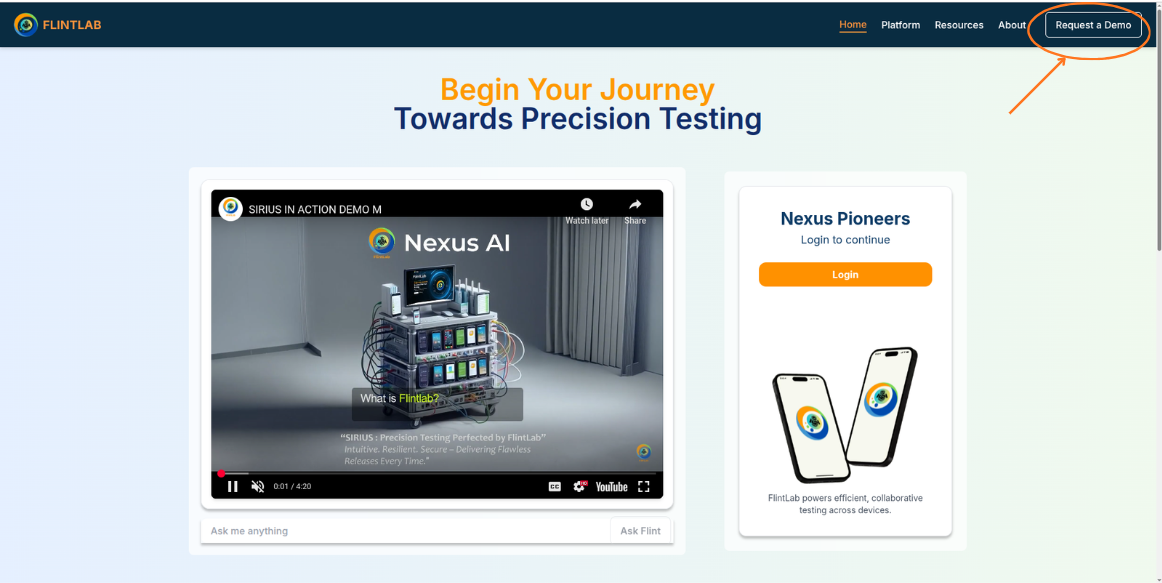
Requesting Demo
The process of getting started with FlintLab begins by requesting a demo through the FlintLab landing page.
Visit FlintLab Landing Page
Navigate to the FlintLab website to begin the demo request process.
Click 'Request Demo' Button
Locate and click the 'Request Demo' button in the top-right corner of the page.
Fill Demo Request Form
Complete all required fields with accurate information.
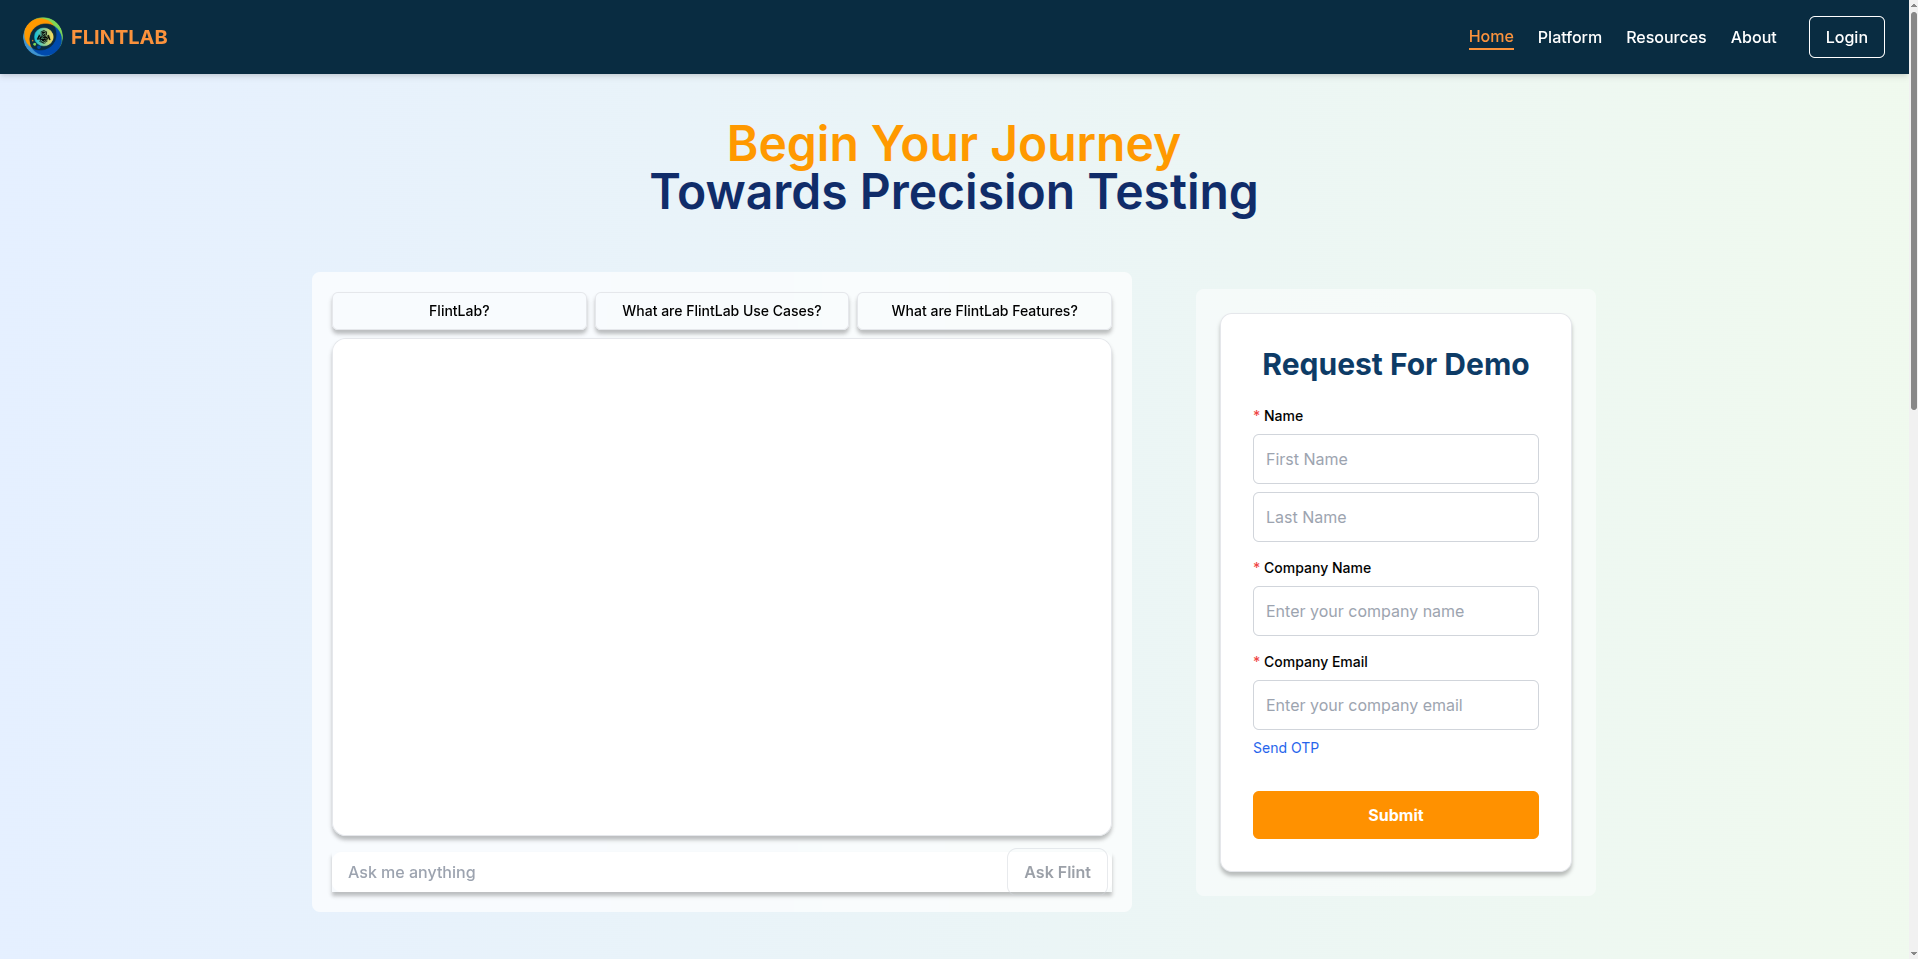
Verify Email Address
Click on Send OTP and check your registered email for a one-time password (OTP) to verify your email address.
Note: If the OTP is not visible in your inbox, please check your Spam or Junk folder.
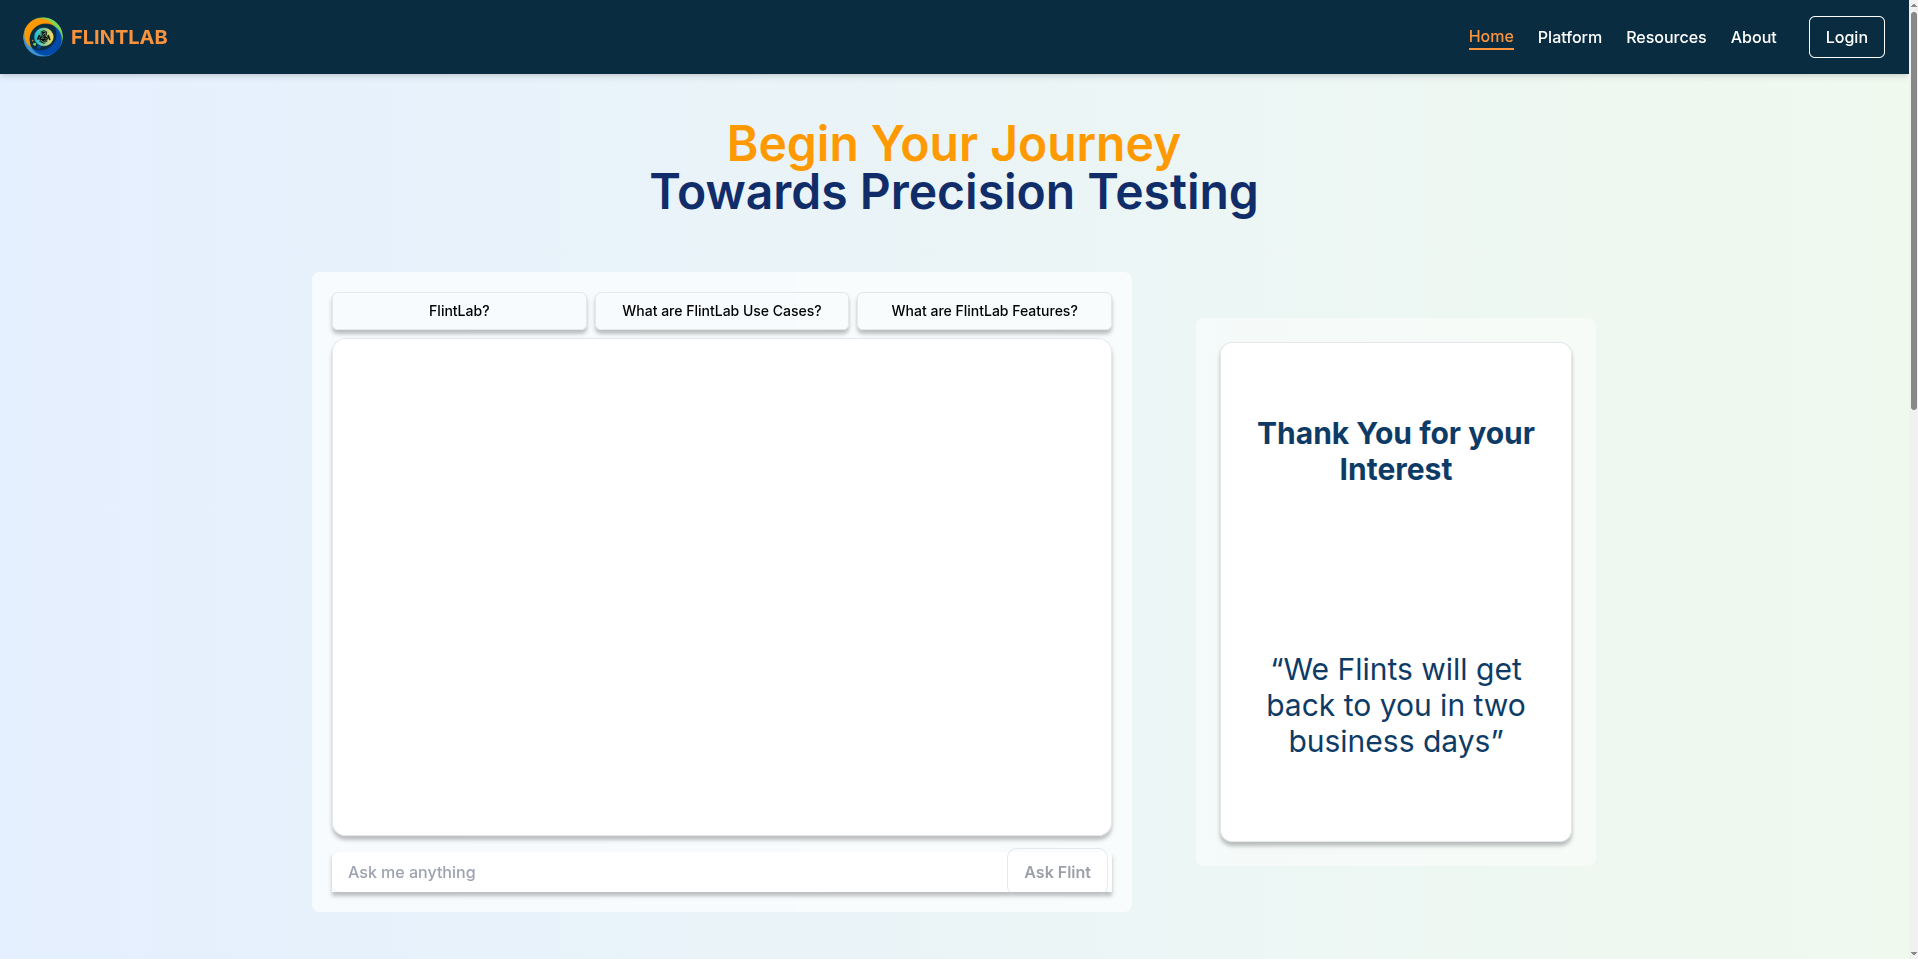
Submit Form
Once email verification is successful, submit the completed form.
Review and Confirmation
The FlintLab team will go through your request and contact you within two business days with further information and next steps.
Prerequisites
- Valid FlintLab user account
- Login credentials
- Stable internet connection
- Modern web browser (Chrome, Firefox, Edge)
Accessing the Platform
- 1
Open FlintLab Website
Navigate to the below URL
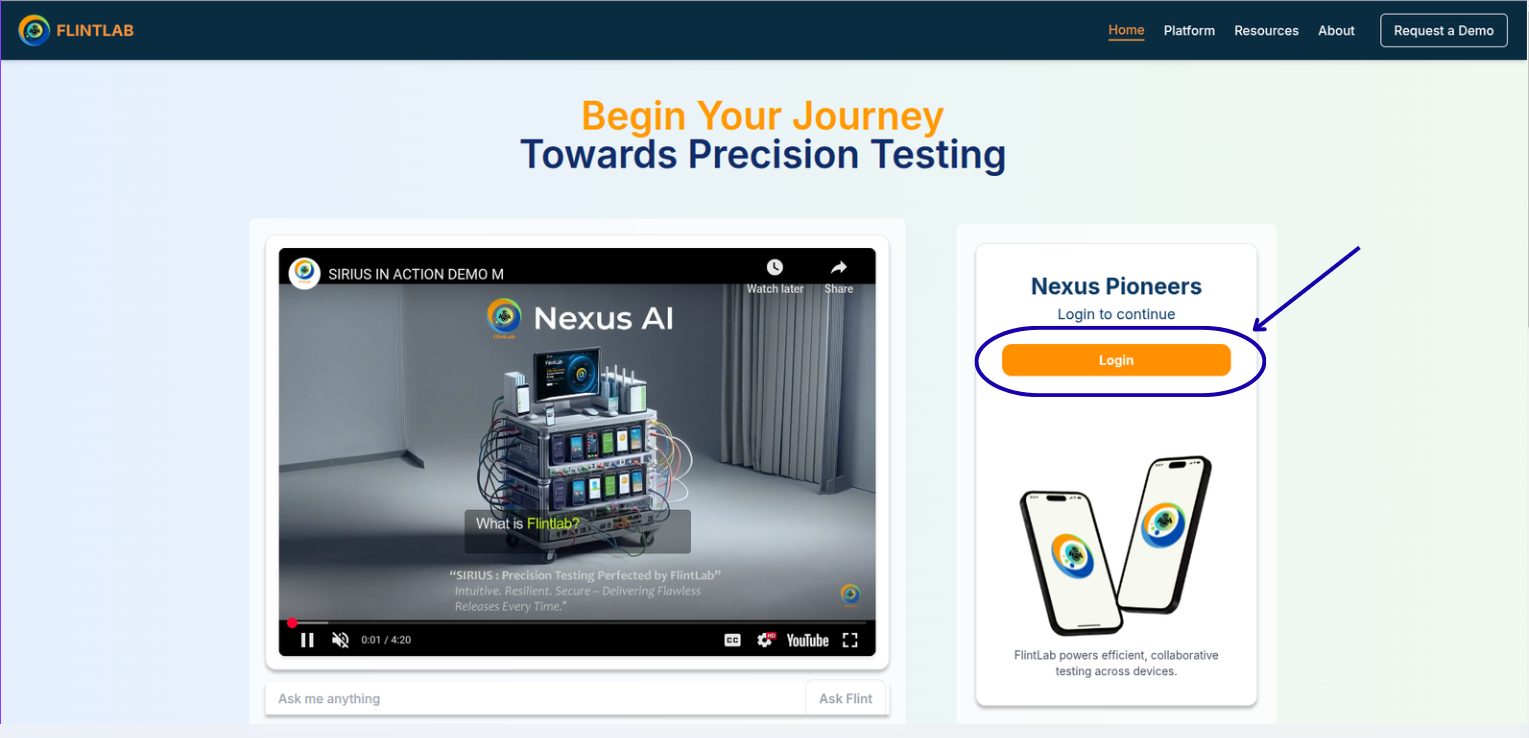
- 2
Click Login
To Access the authentication page
- 3
Authenticate
Enter your credentials and Click on Login.
- 4
Access Platform
You will be redirected to Sirius Platform
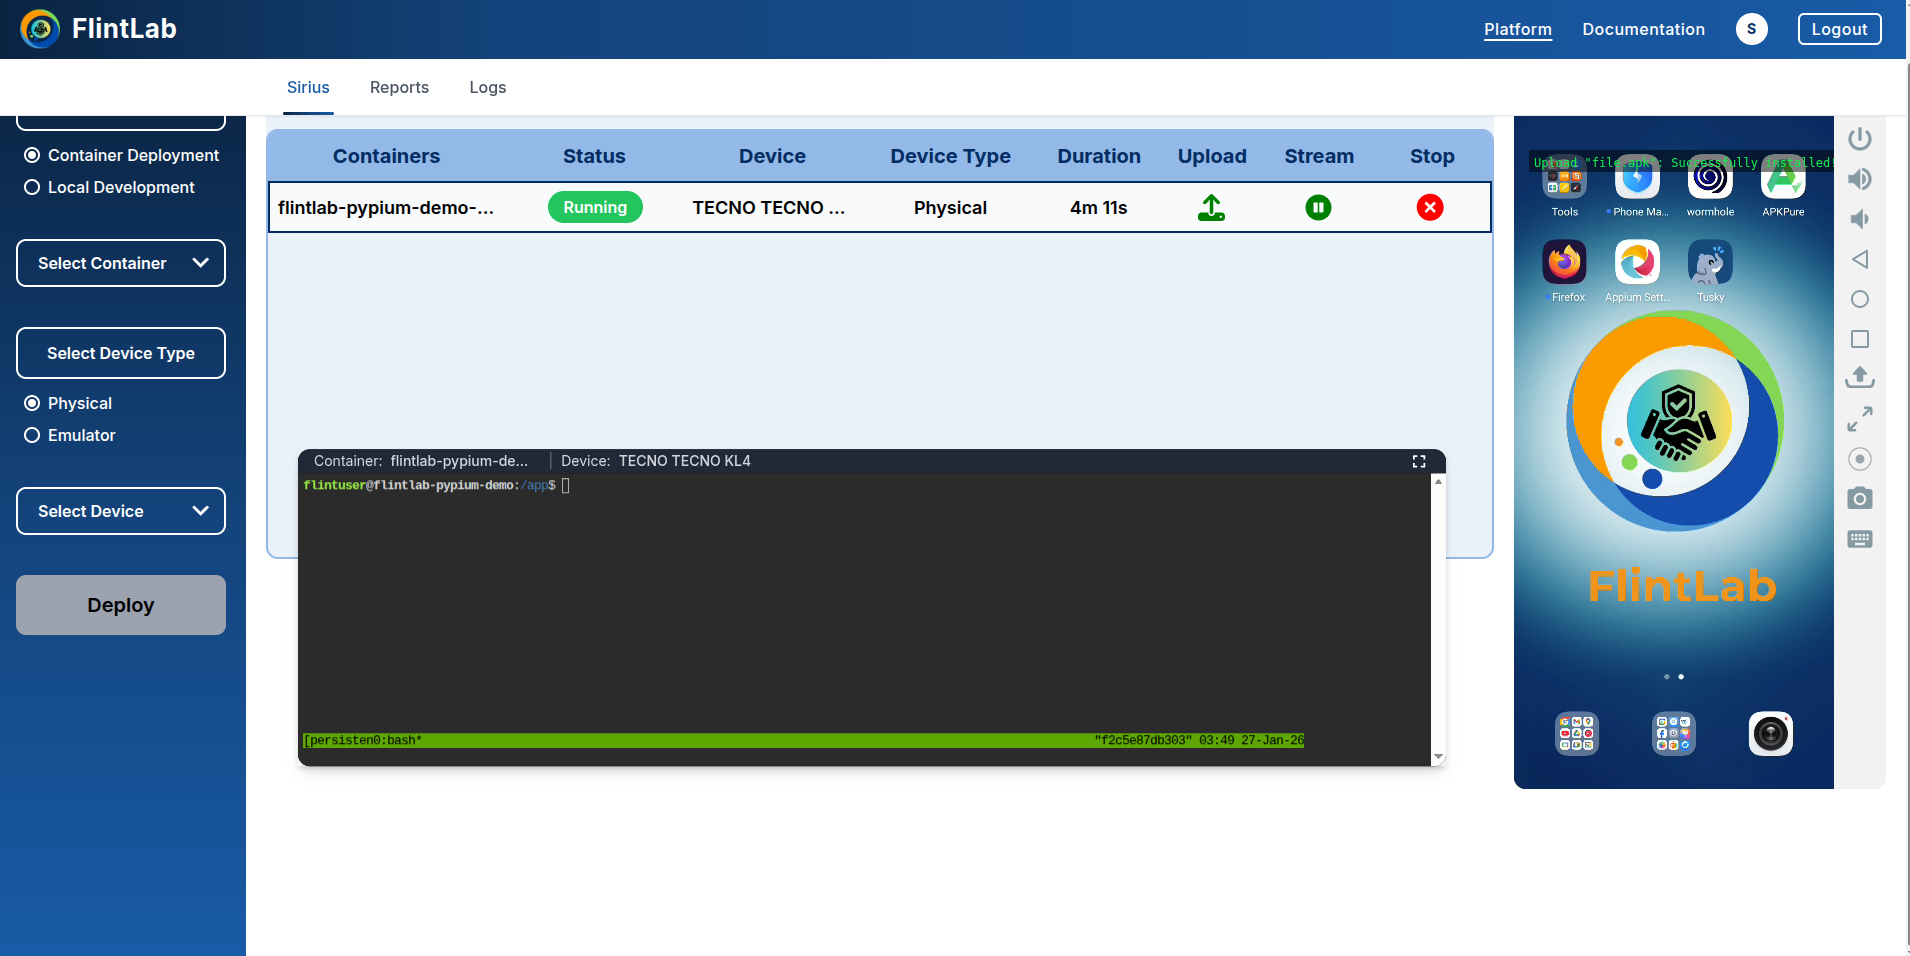
Sirius Platform
This is the main workspace where users configure executions, deploy containers, stream devices, upload applications, and access reports and logs.
Execution Configuration
- Select execution mode
- Choose physical devices or emulators
Application Management
- Upload APK files
- Deploy automation scripts
Session Management
- Deploy and stream sessions
- Monitor real-time execution
Reports & Analytics
- Access execution reports
- View detailed logs
Choosing an Execution Mode
The Sirius Platform exposes two execution approaches:
Sirius Secure Workspace
This is the recommended approach for automation testing. Automation tests run inside a test-execution container connected to a selected device.
This mode is ideal when:
- You do not have a local automation environment
- You need consistent, repeatable automation runs
It provides:
- Standardized execution environments
- Dependency isolation
- Reliable automation results
Sirius Device Session
Sirius Device Session is designed for manual and exploratory testing, allowing users to interact with real or emulated devices directly from the browser.
Beyond live device streaming, manual testers can perform:
- Upload and install Android APKs directly onto the device without local ADB setup.
- Interact with the device in real time using mouse, touch, and keyboard inputs for UI validation and exploratory testing.
- Switch between full-screen and default device views for better visibility and inspection.
- Record device sessions to capture test flows, reproduce issues, or share results with stakeholders.
- Capture screenshots at any time for documentation, bug reporting, or validation purposes.
Workflows
End-to-End Sirius Secure Workspace Workflow
This section describes the complete workflow for deploying a container, executing automation tests on a device, analyzing results, and completing the session using the UI.
Use Case
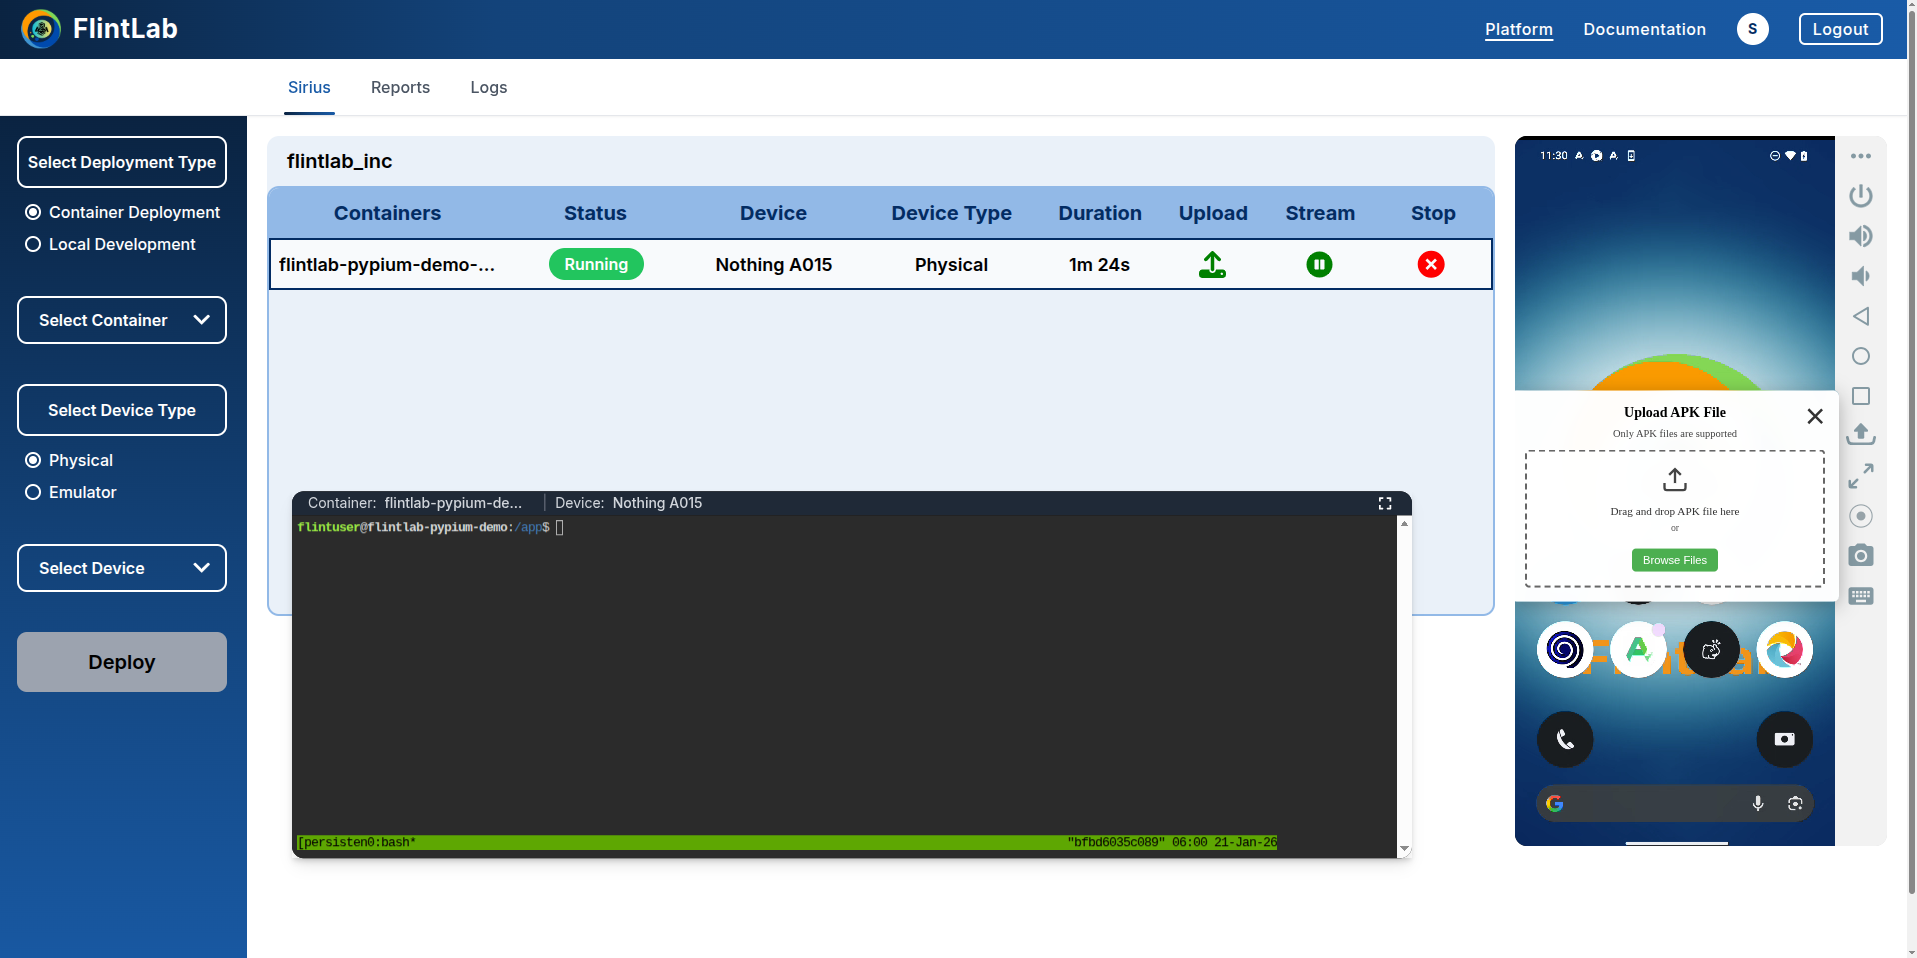
Configure Sirius Secure Workspace
Set up your workspace settings
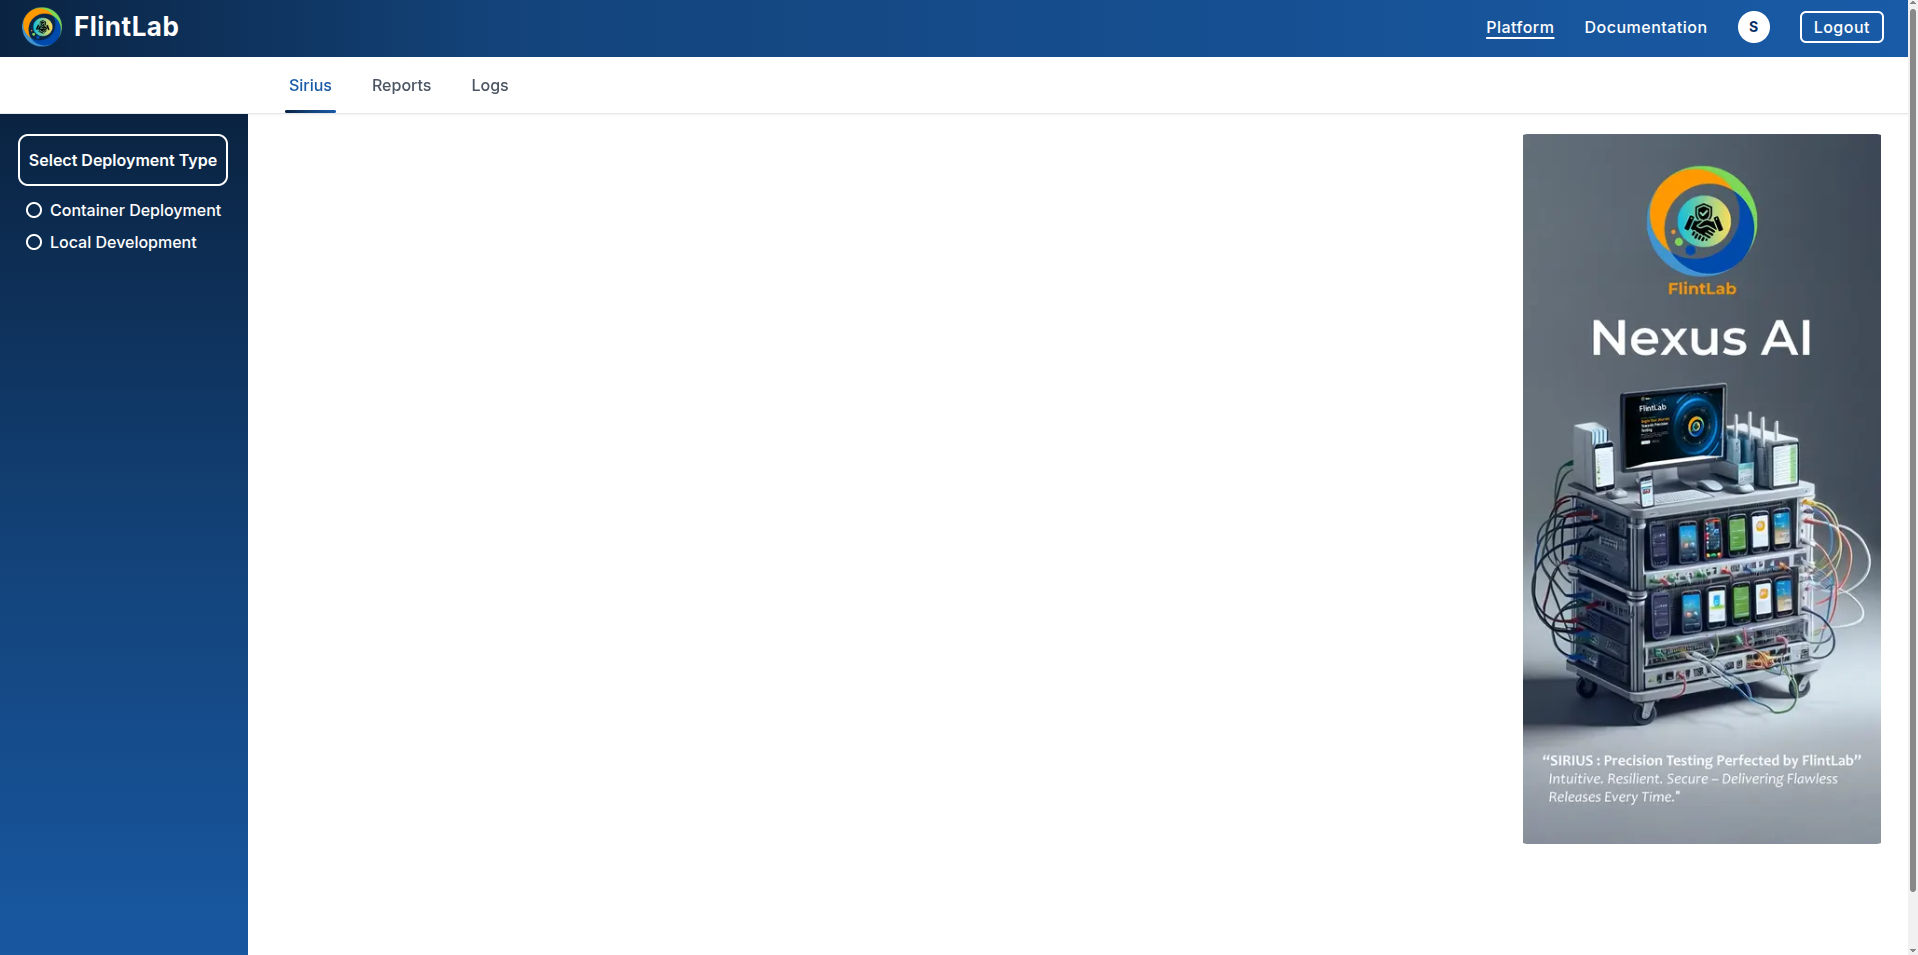
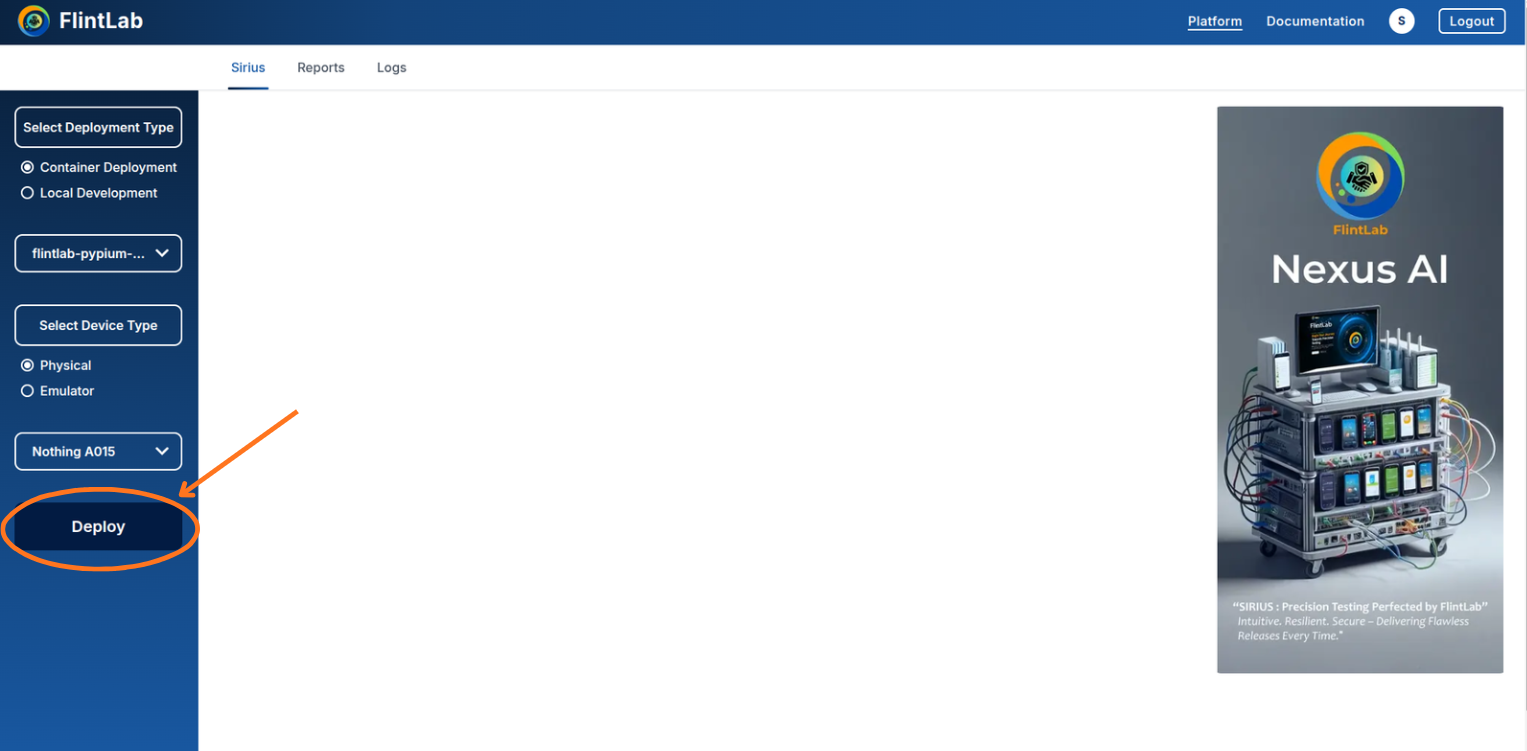
- On the left sidebar, find 'Select Deployment Type'
- Select 'Sirius Secure Workspace' from the available options
- Click on the 'Select Container' dropdown and choose the required container
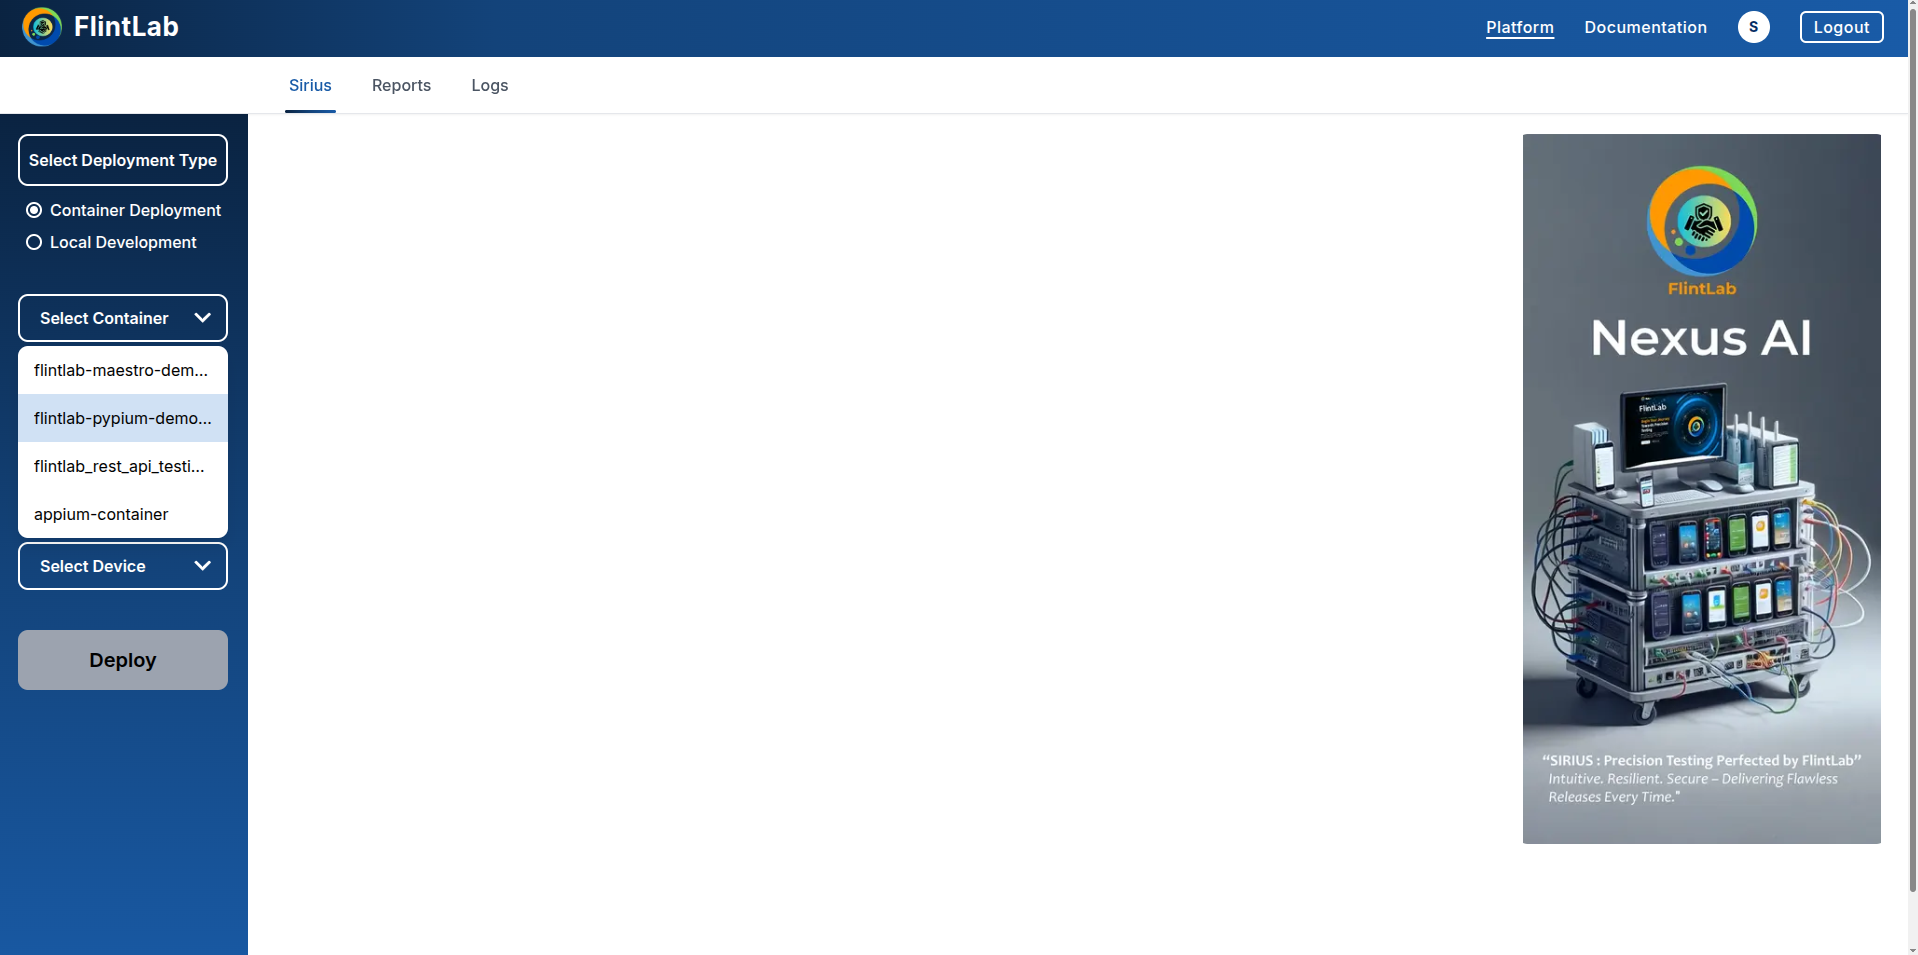
Select Device Type and Device
Choose between physical devices or emulators
- Choose the device category: Physical or Emulator
- Under 'Select Device' dropdown, pick any device from the list
Deploying the Container
Start your deployment
Click Deploy Button
Click the Deploy button to initiate the deployment process.
Monitor Deployment Status
Wait until the status changes to running.
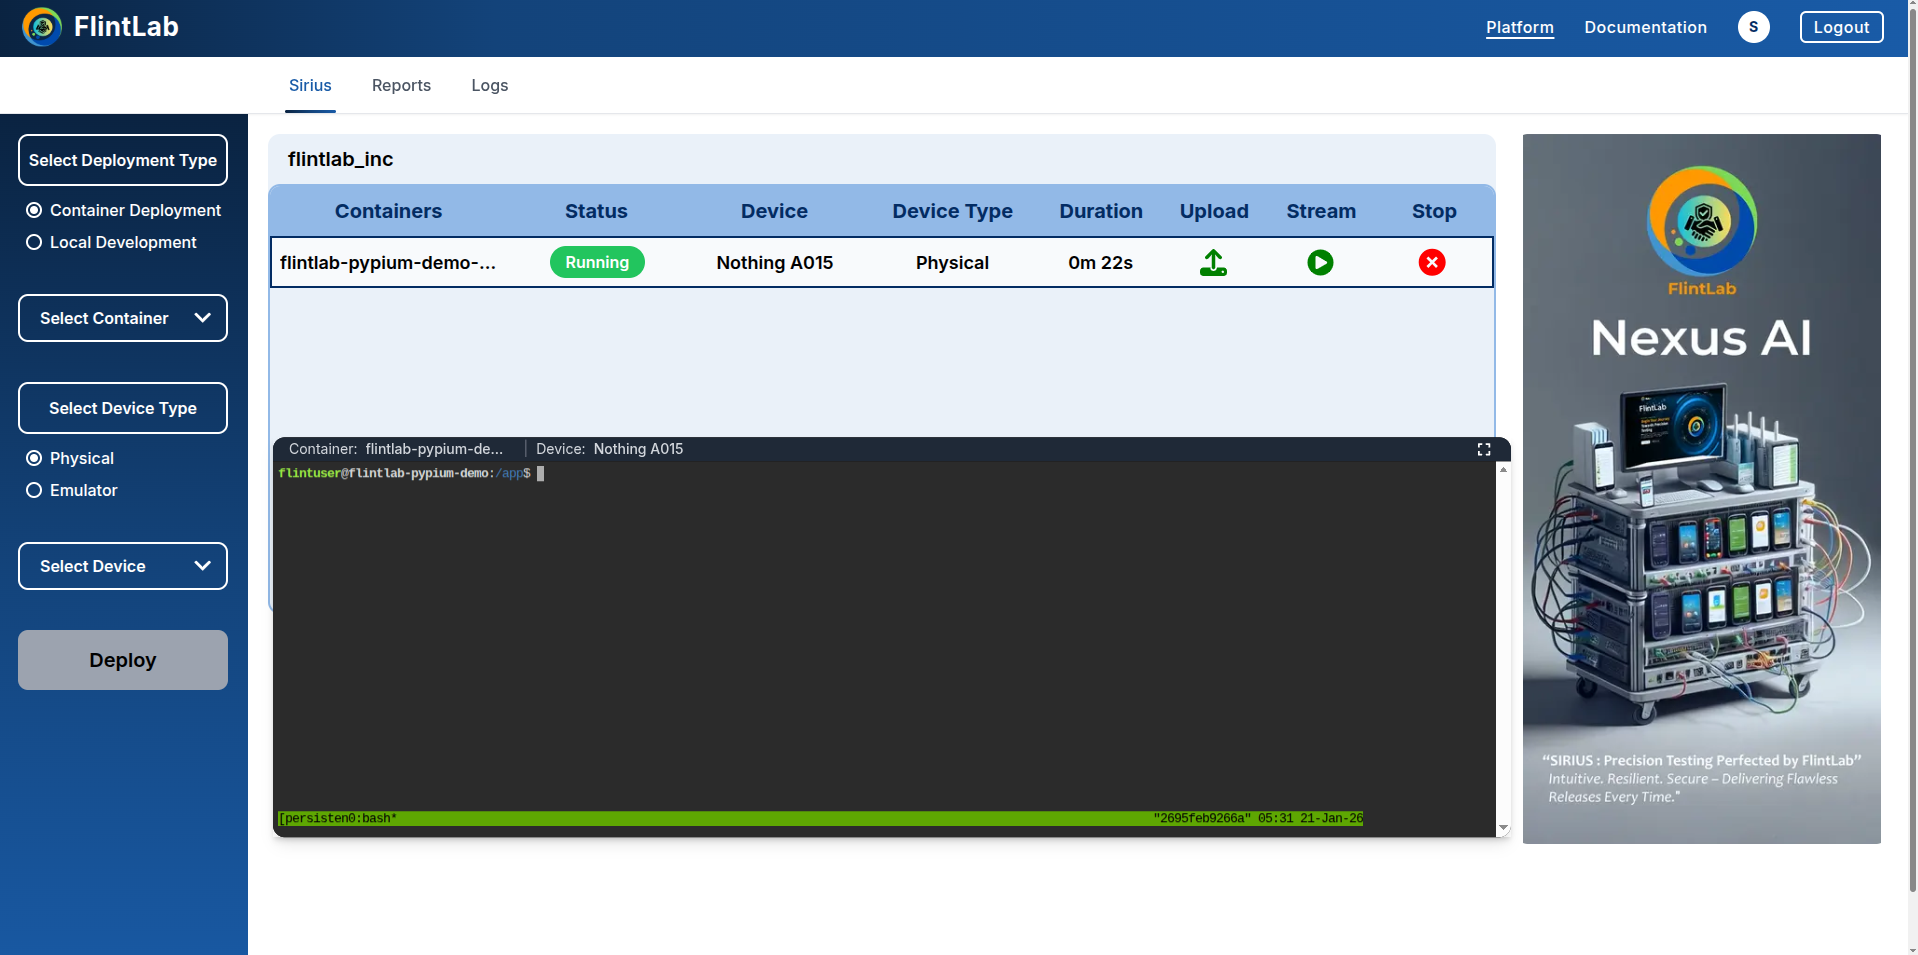
Start Device Streaming
Click the Stream icon to start streaming the device screen.
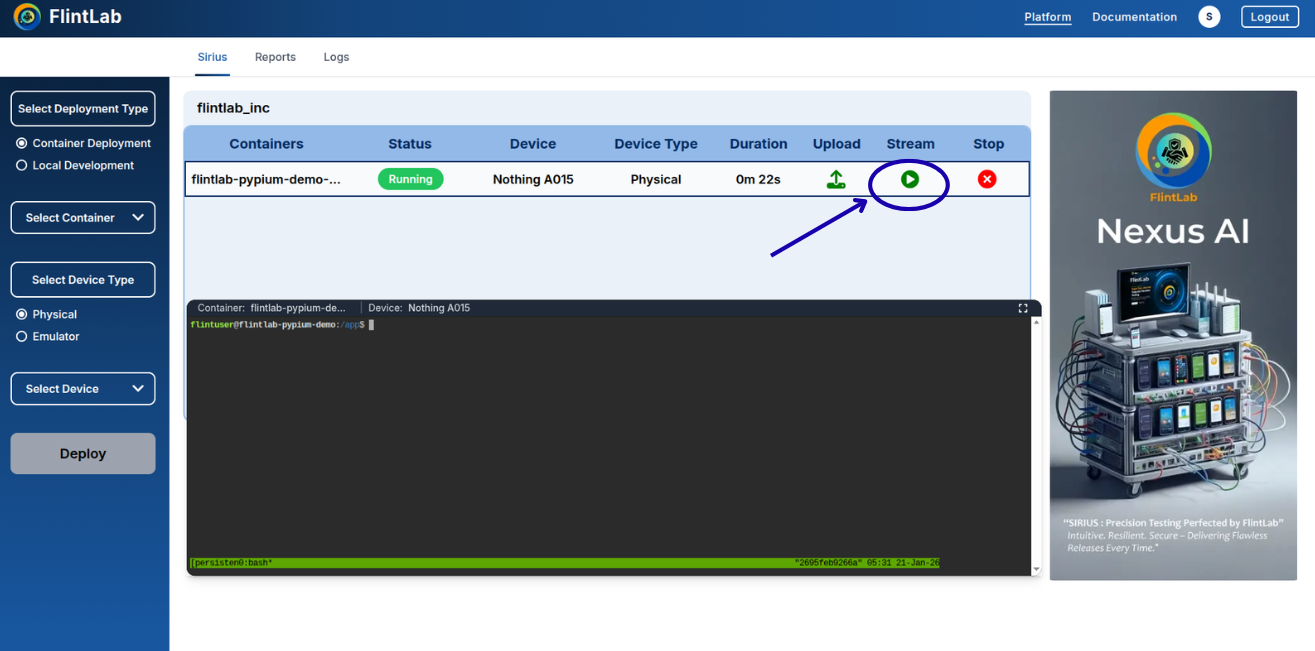
Upload the Application (APK)
Upload your application to the selected device
Use the Upload APK option available in the device control panel.
Upload the Automation Scripts
Add automation files to the container
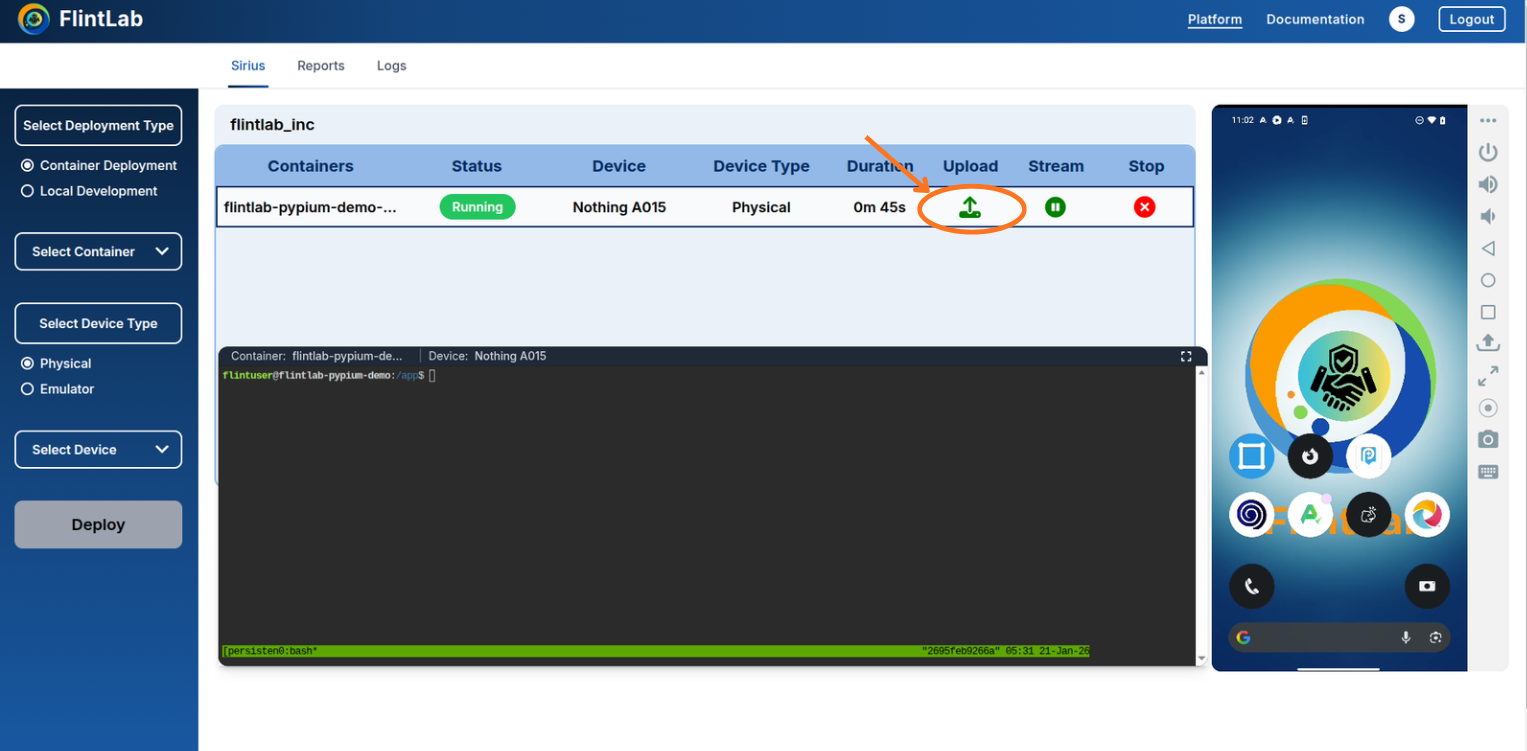
- Upload automation files using the Upload icon in the container row
- Users can upload test scripts, configuration files, or supporting resources
- A green check mark indicates successful upload
- Verify the uploaded file in the terminal using ls command
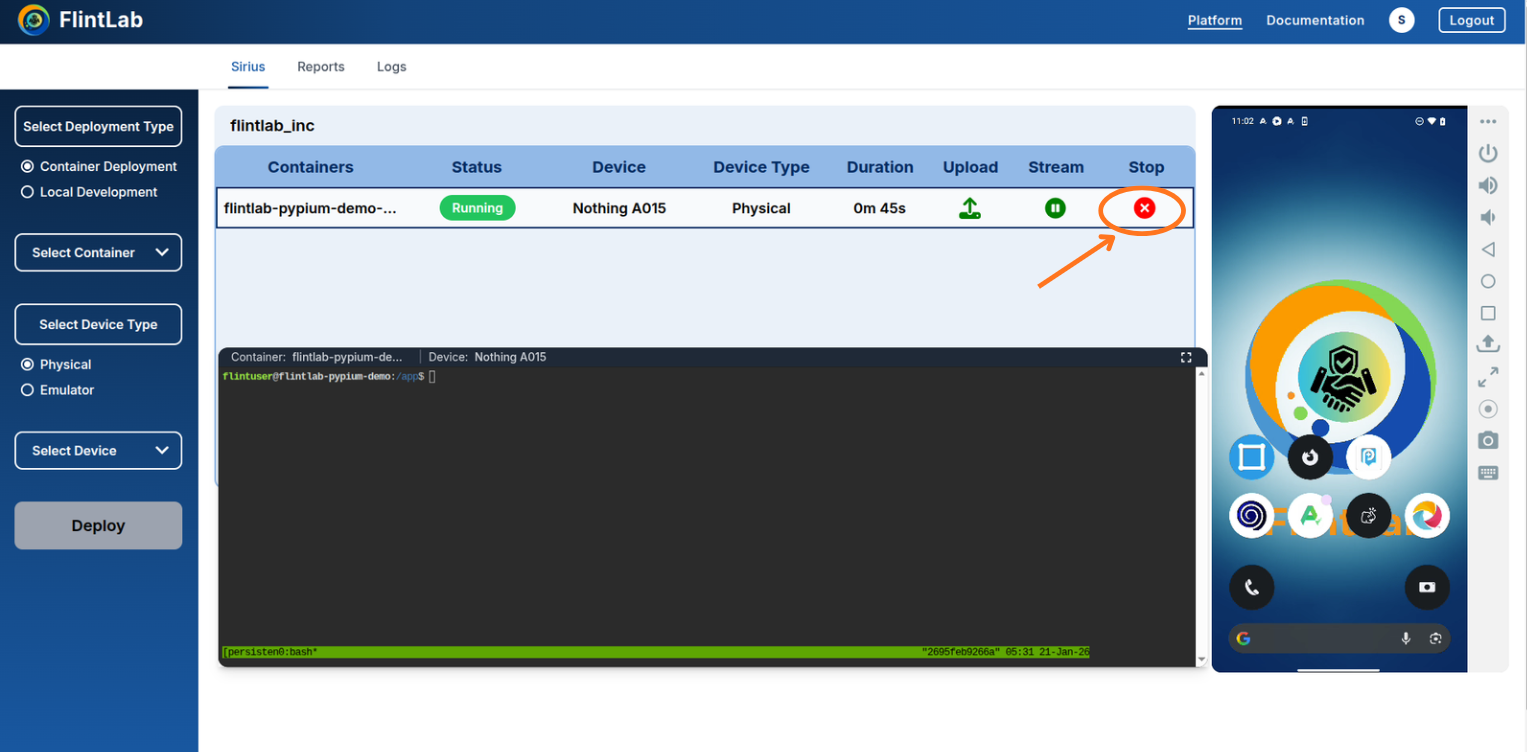
Run the Tests and Stop the Container
Execute tests and manage container lifecycle
- Run the automation test scripts after uploading APK and automation scripts
- If automation scripts include report generation logic, test reports are automatically generated
- Use execution flags to retain results from multiple runs
- After execution completes, click the Stop icon to stop the container
End-to-End Sirius Device Session Workflow
This section describes the complete workflow for launching a device-only session, performing manual testing on a physical device or emulator, and completing the session using the UI Platform.
Use Case
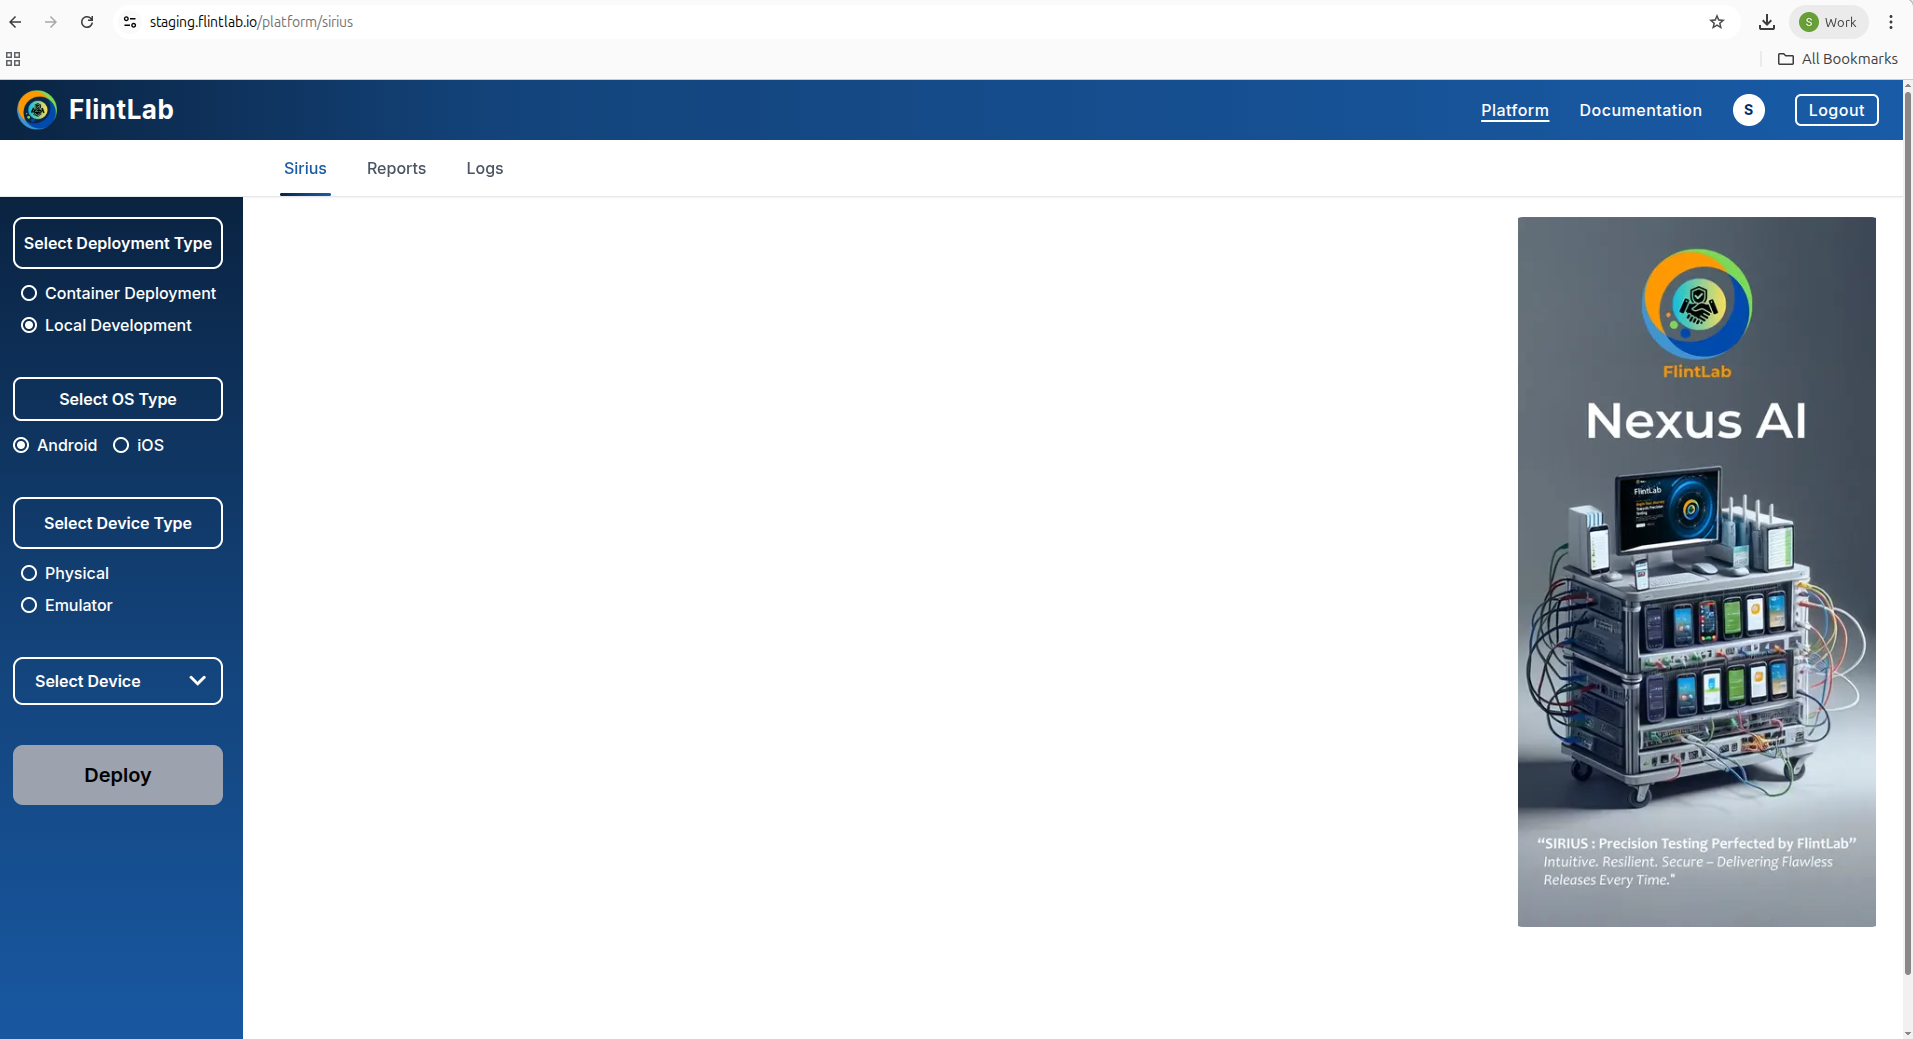
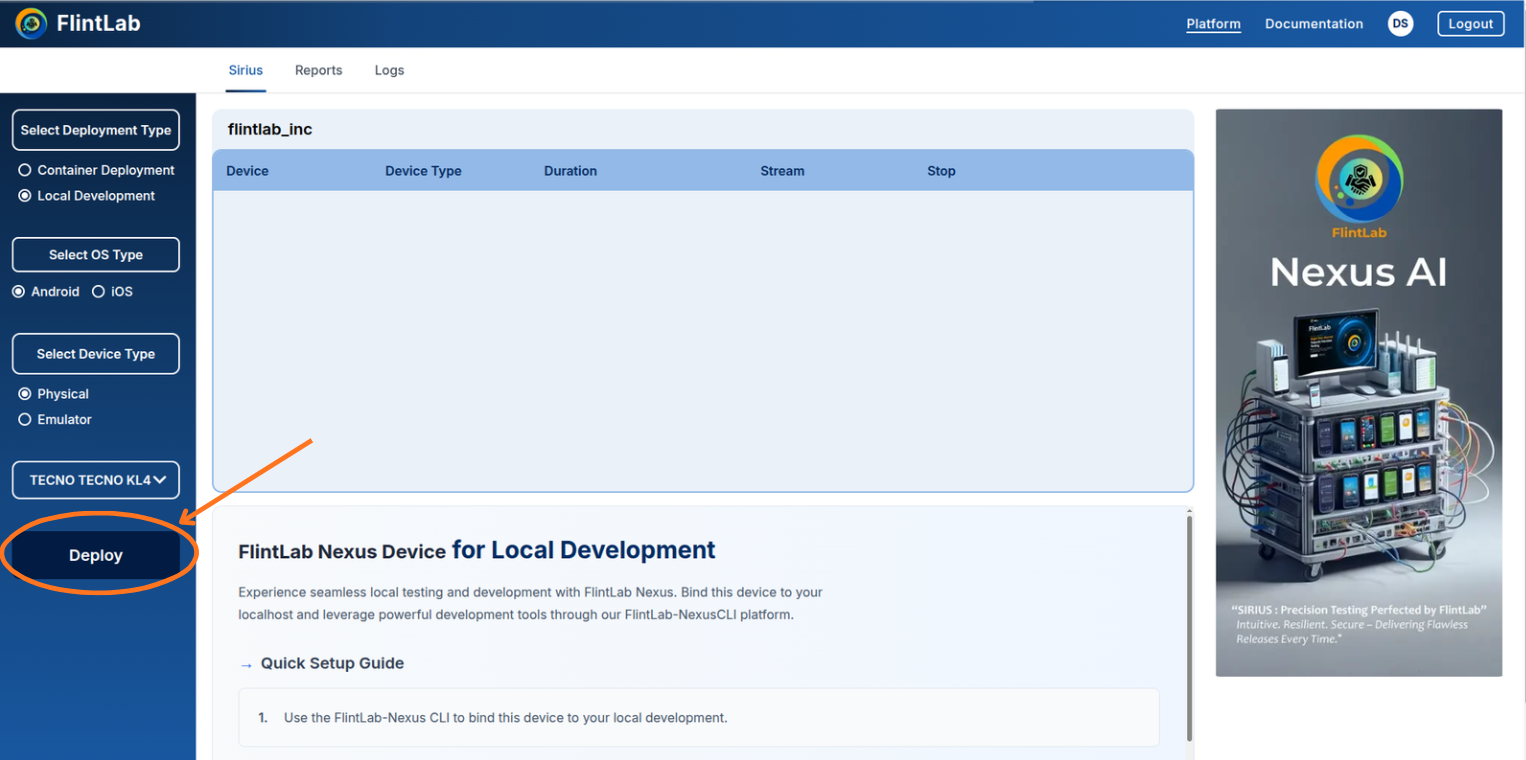
Configure Sirius Device Session
Set up device session
- On the left sidebar, locate 'Select Deployment Type'
- Select Sirius Device Session
- Choose the required OS Type: Android or iOS
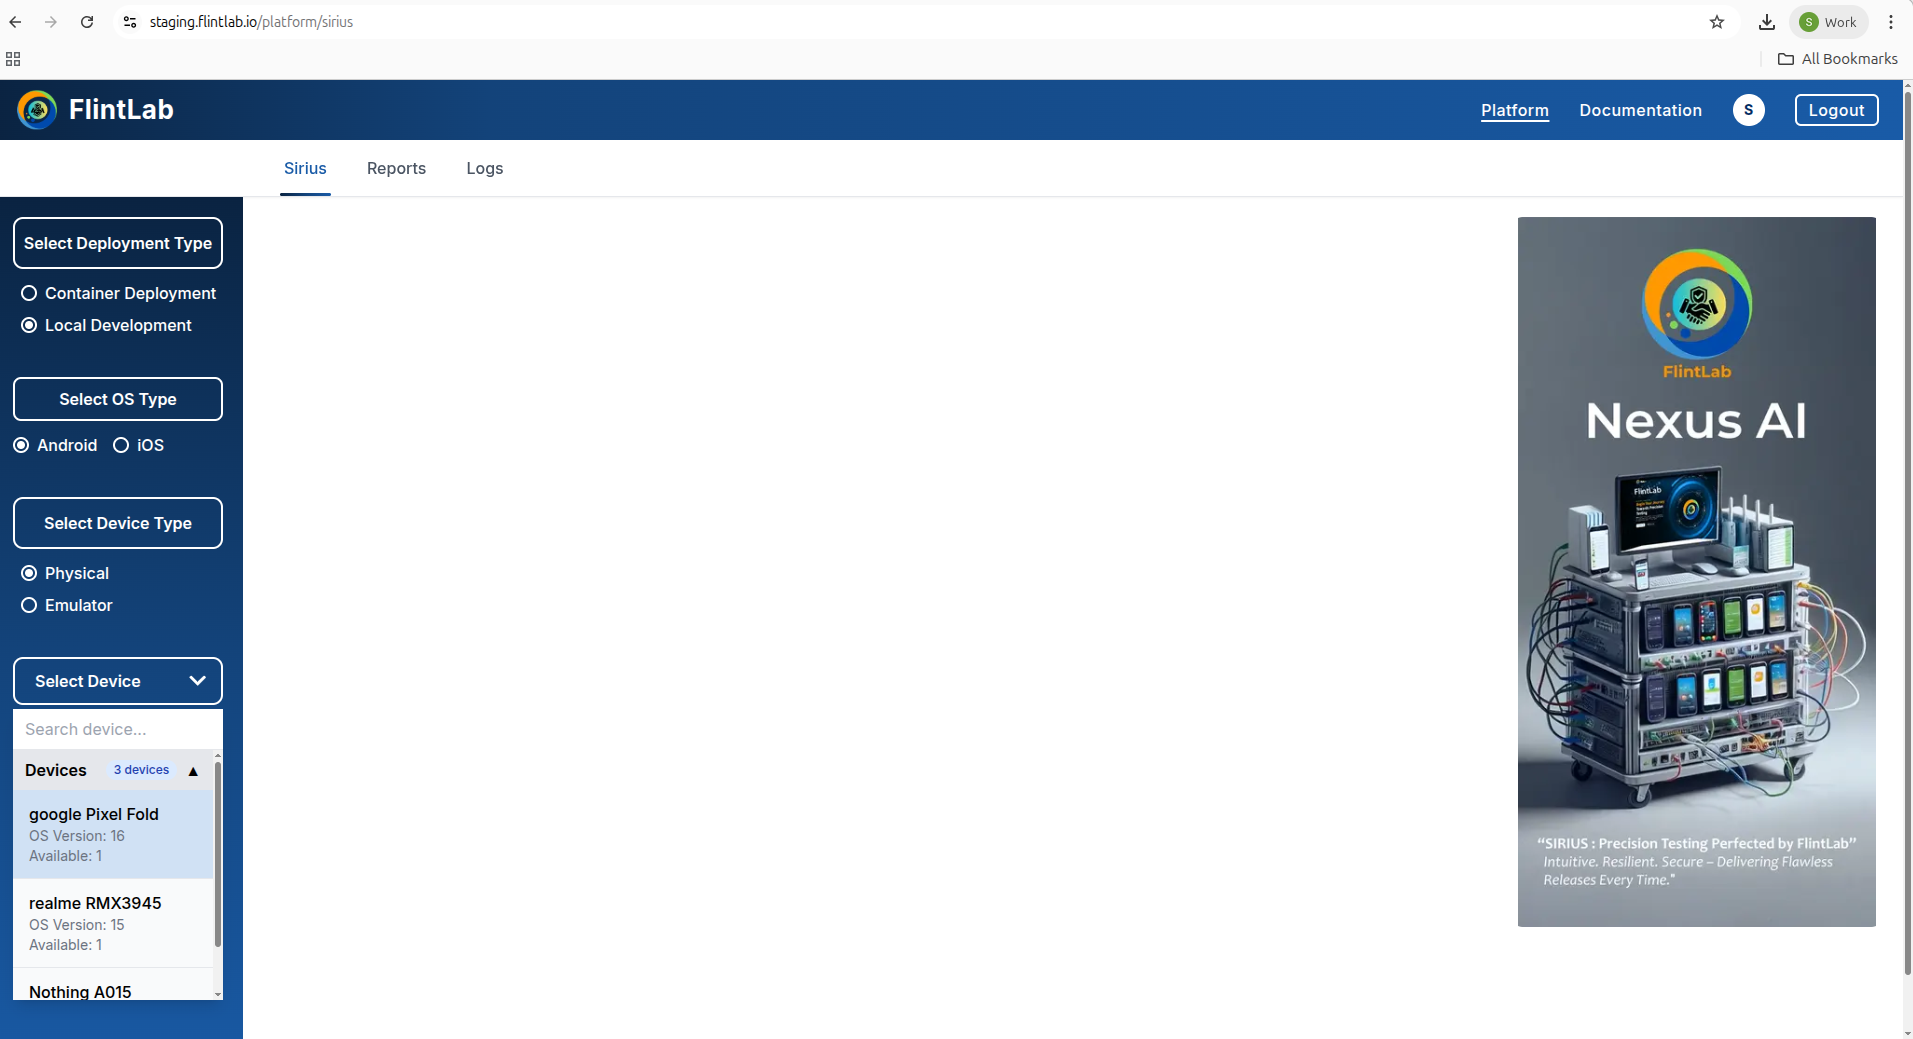
Select Device Type and Device
Choose your testing device
- Choose device category: Physical or Emulator
- Under 'Select Device' dropdown, pick your device
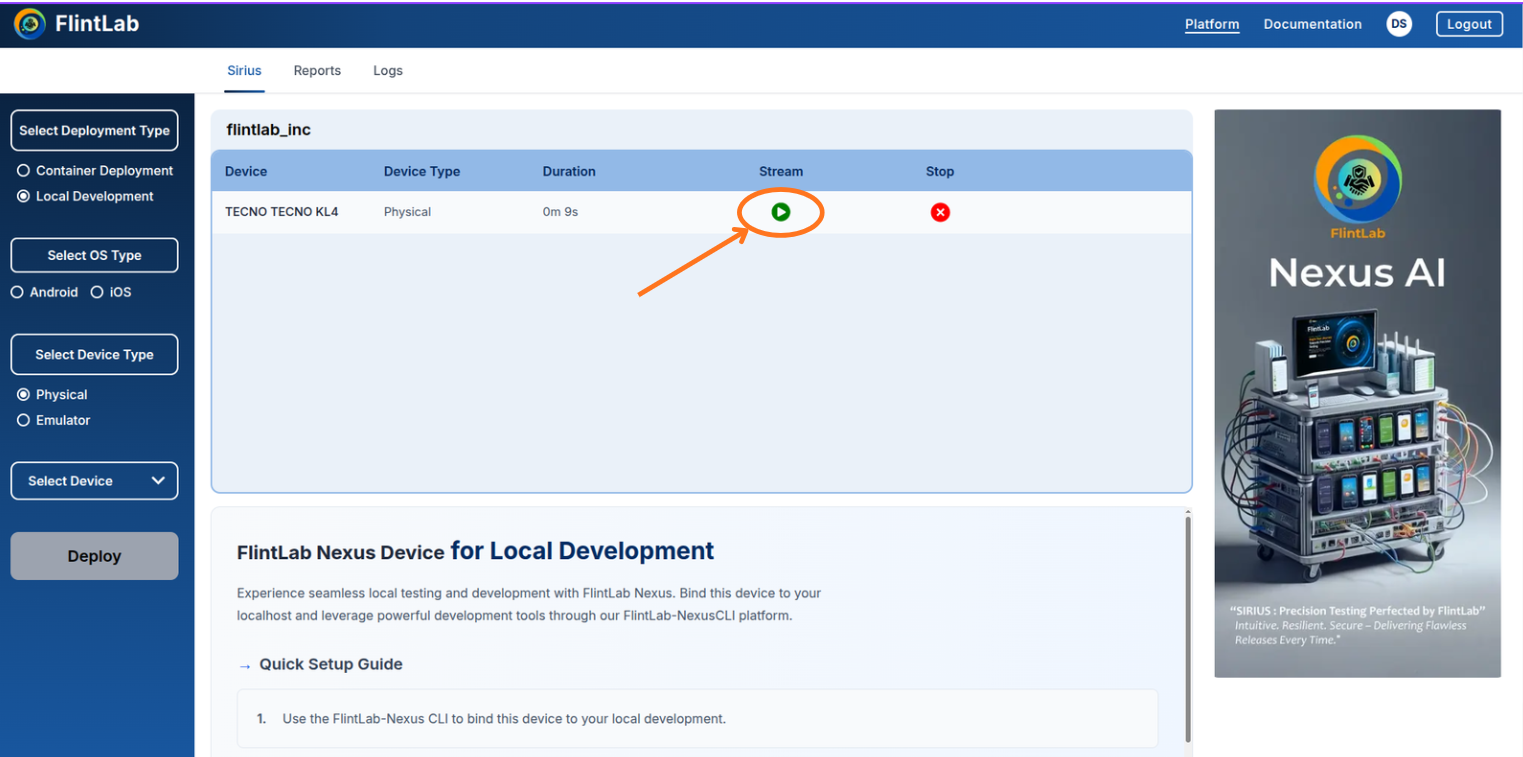
Deploy Device Session
Start your device session
- Click the Deploy button
- A new row will appear showing Device Name, Device Type, Duration, Stream, and Stop
- Click the Stream icon to start streaming the device
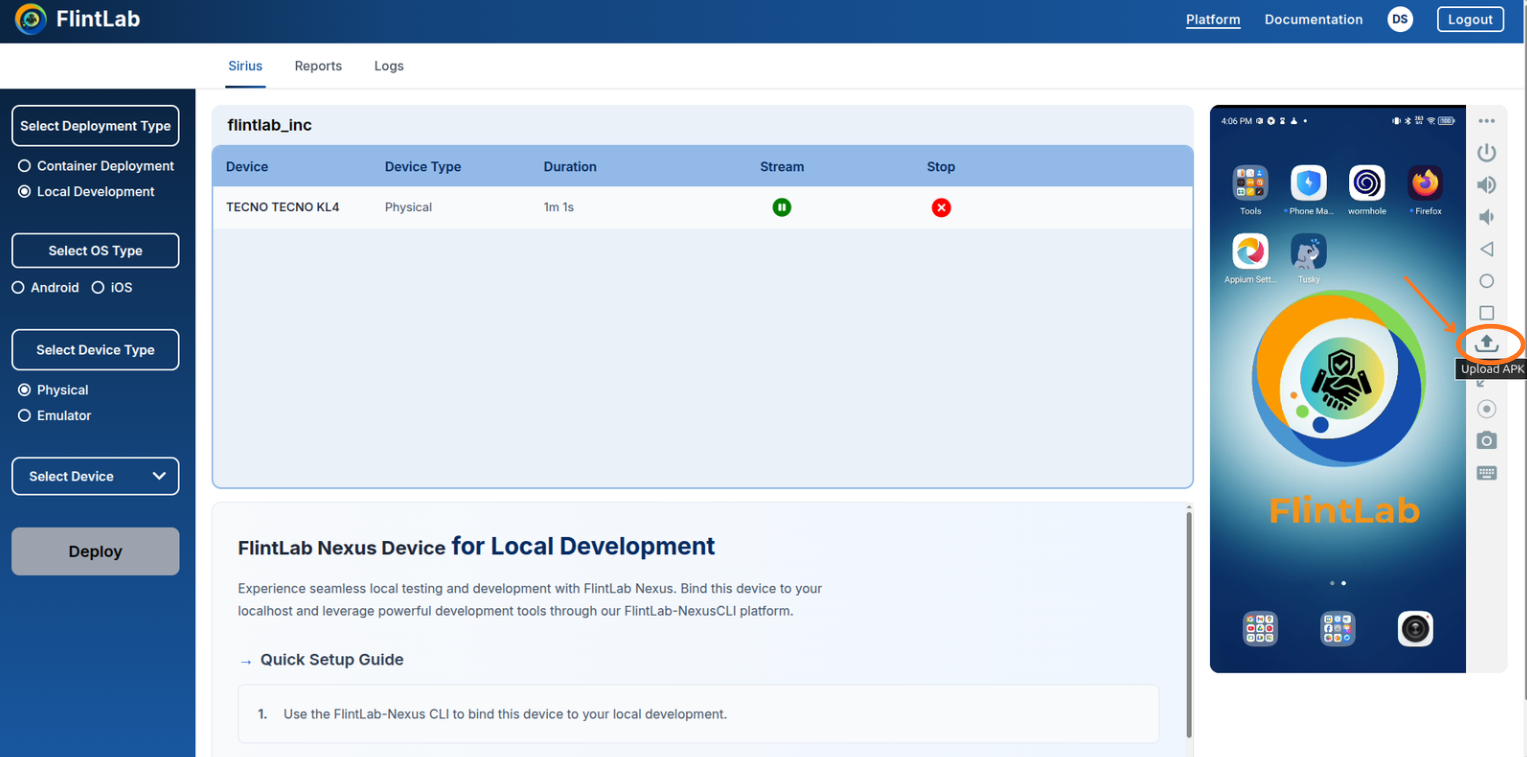
Upload the Application (APK)
Install application for manual testing
Upload your application using the Upload APK option.
Perform Manual Testing
Interact with the device in real-time
After successfully uploading the application, users can begin manual testing during the live device session.
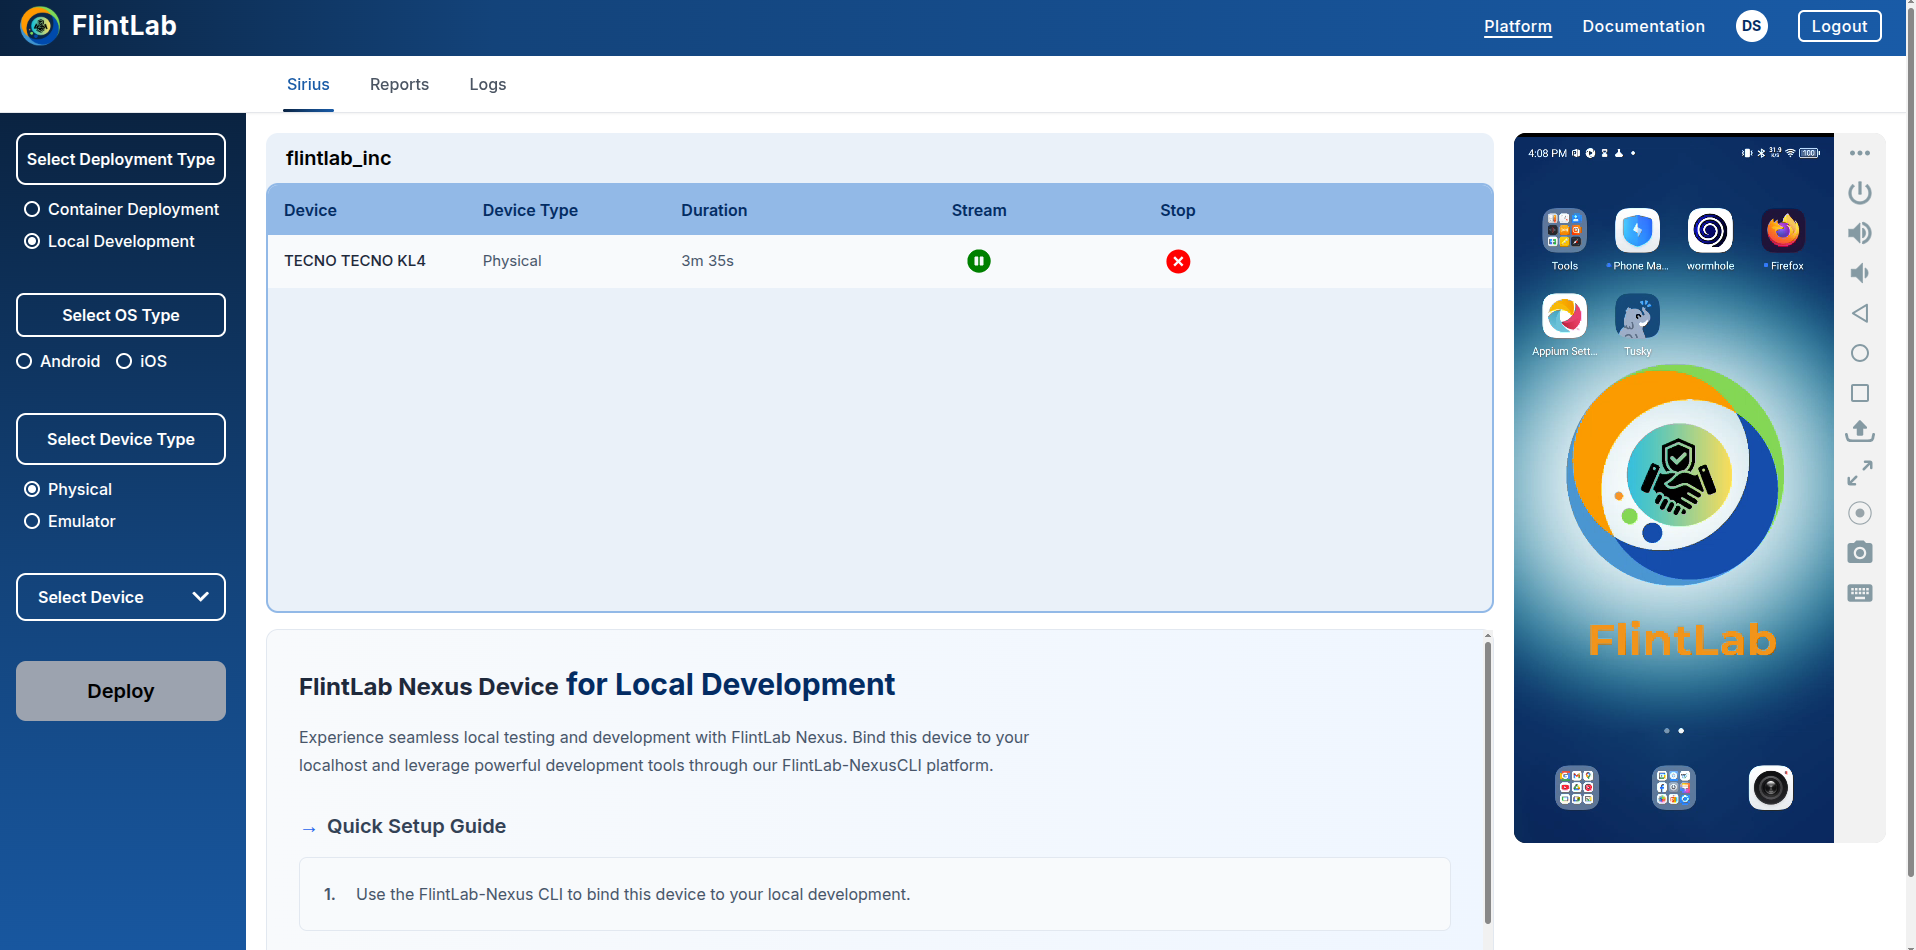
Users can also:
- Interact with the device in real time using touch and keyboard inputs
- Maximize or minimize the device view for better visibility
- Start and stop session recording for later review or sharing
- Capture screenshots for documentation, validation, or bug reporting
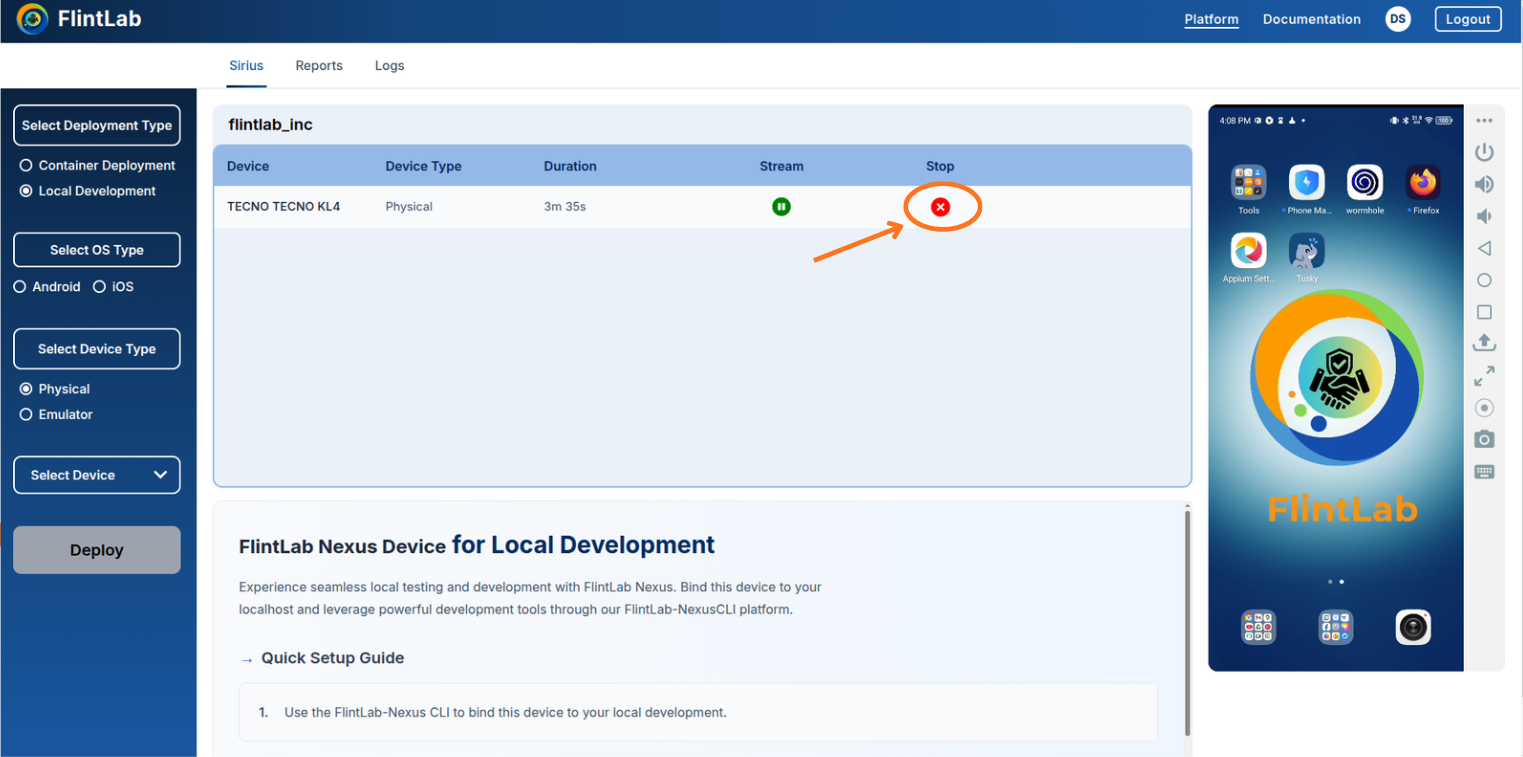
Stop the Device Session
End your testing session
Once manual testing is complete, click the Stop icon in the session row. This action ends the session and releases the device back to the device pool.
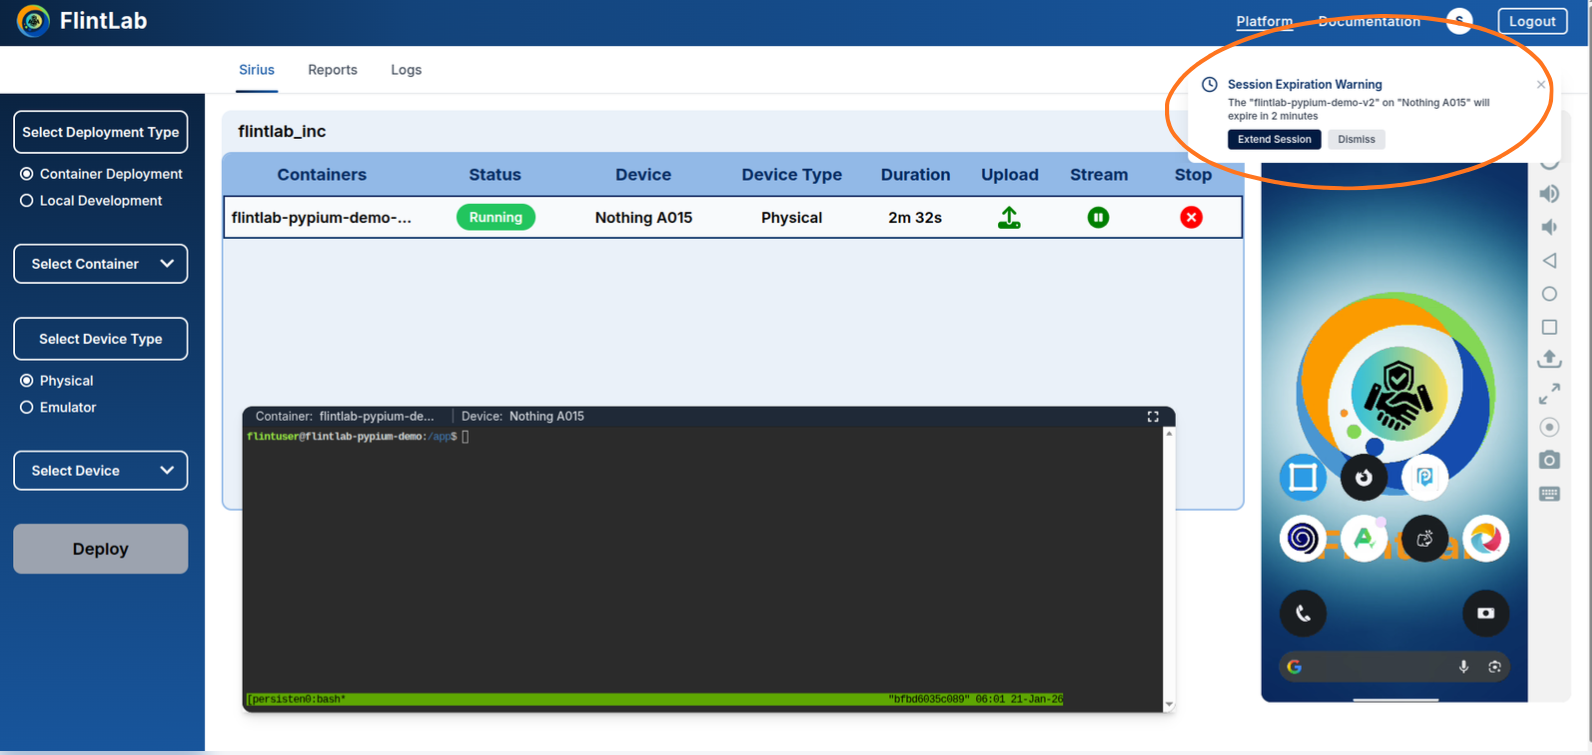
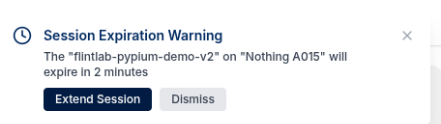
Session Extension
Managing and extending your testing sessions
Automatic Notification
Steps to Extend Session:
Click Extend Button
Click the Extend button to continue your session
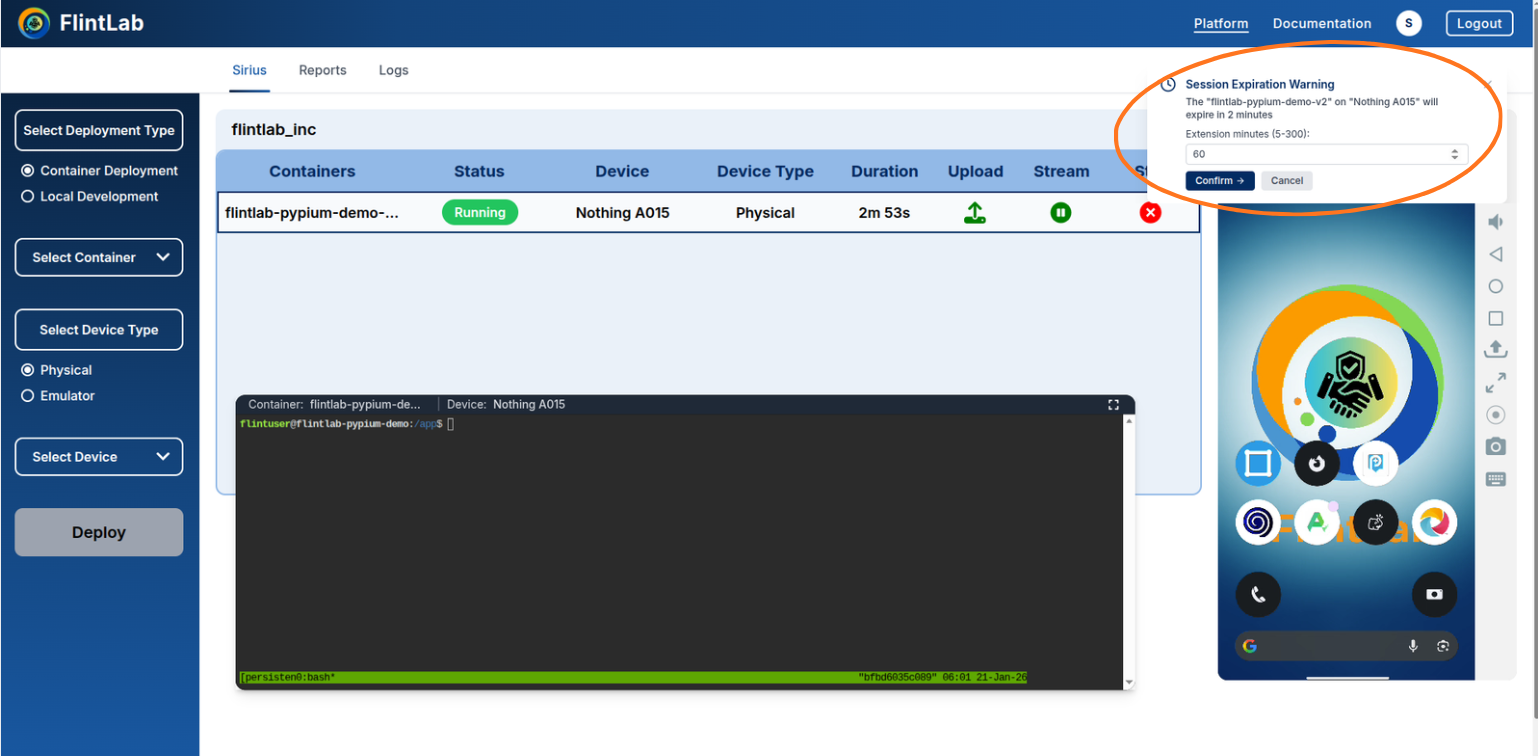
Select Duration
Select the amount of time you want to extend the session for and click confirm.
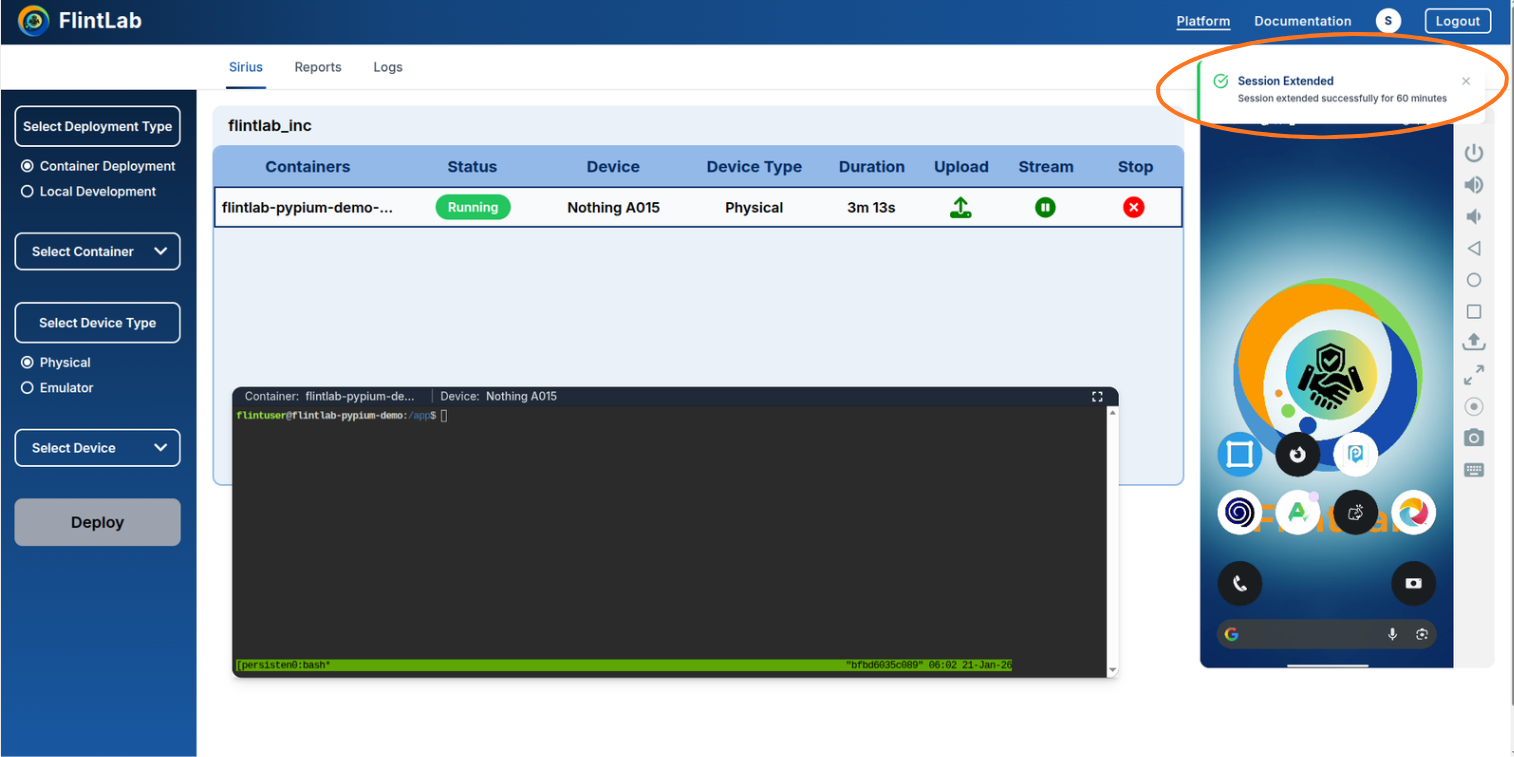
Confirm Extension
Confirm the session is successfully extended.
Important Notes
- Session extensions are available for both Sirius Secure Workspace and Sirius Device Session
- You can extend multiple times if needed during long testing sessions
- The pop-up appears in the top-right corner and remains visible for 2 minutes
- If you don't extend, the session will automatically terminate at the scheduled time
Reports
Access test execution reports and download them from sirius secure workspace
Note
Navigate to Reports Tab
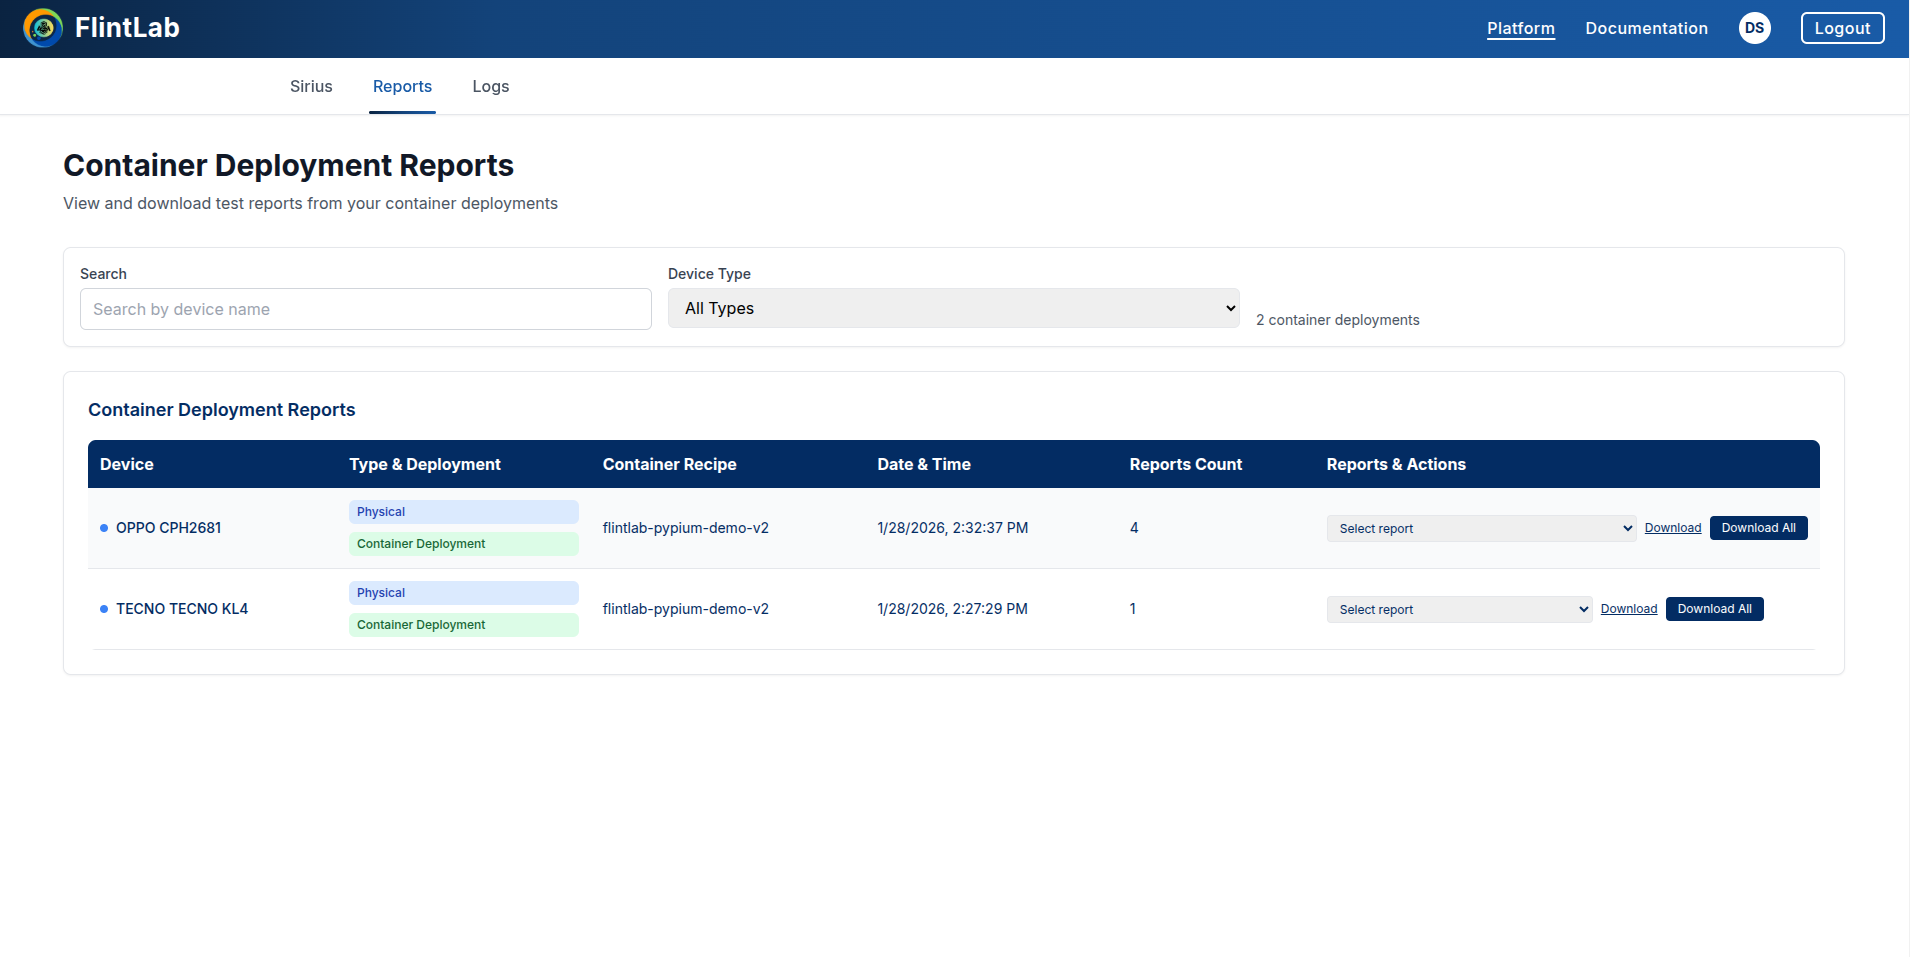
After completing test execution, navigate to the 'Reports tab' located in the sub-navigation bar.
Download Reports
If the automation scripts include report generation, the reports will be stored in the Reports section.
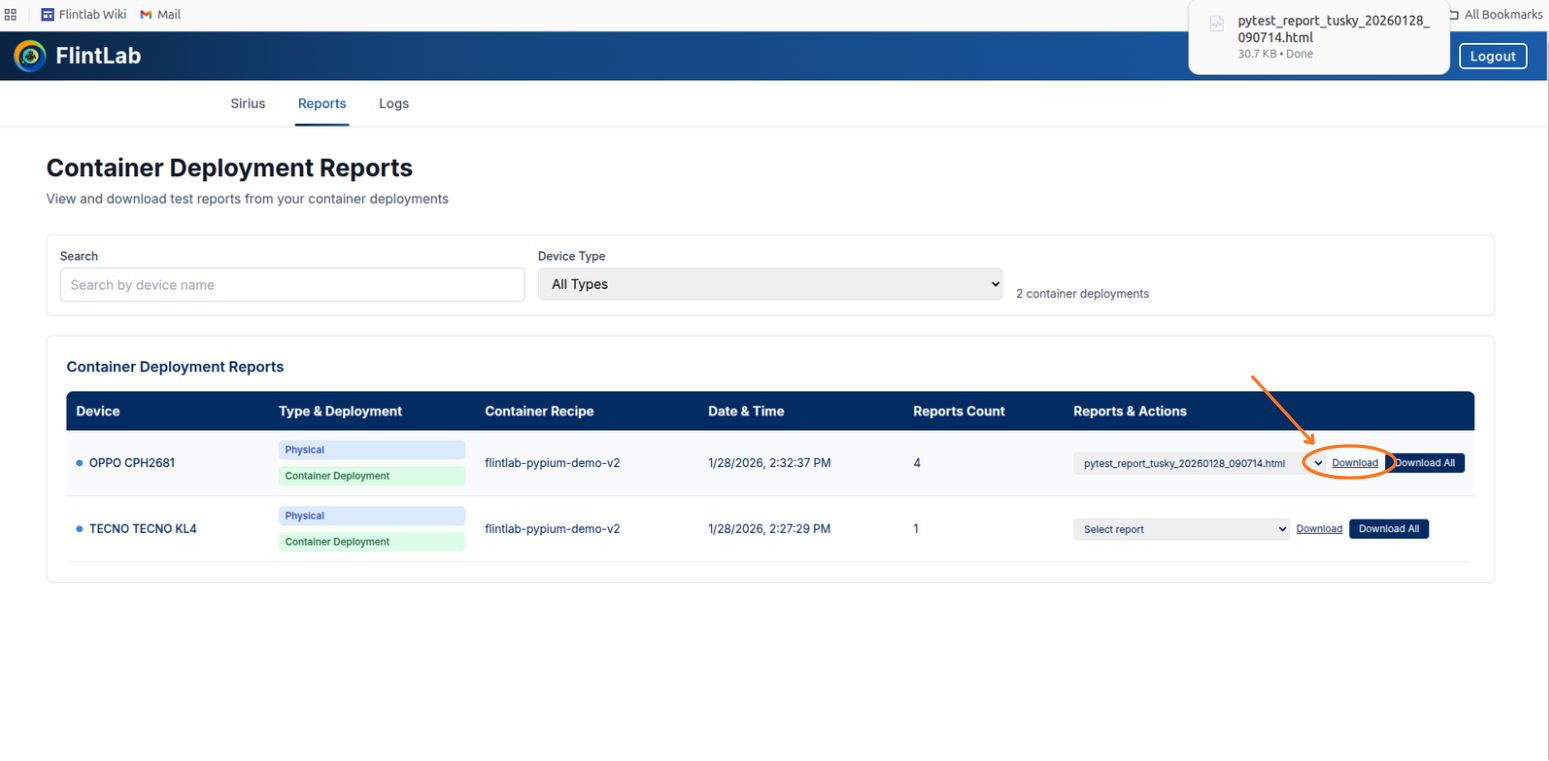
Download Individual Report
To download a specific report, select the report you want and click the "Download" button next to it.
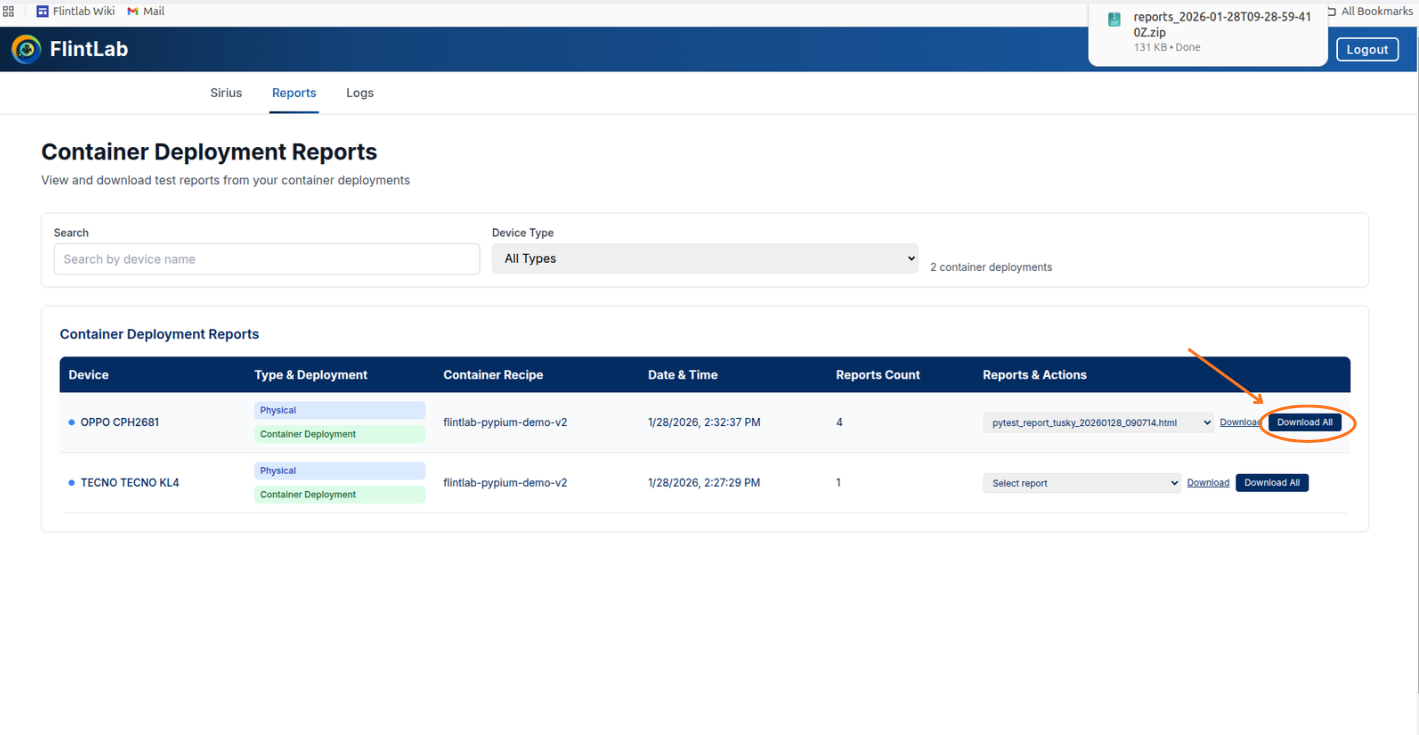
Download All Reports
To download all reports at once, click the "Download All" button.
Logs
Access and download device logs for analysis
Navigate to Logs Tab
Navigate to the Logs tab in the sub-navigation bar to access device logs.
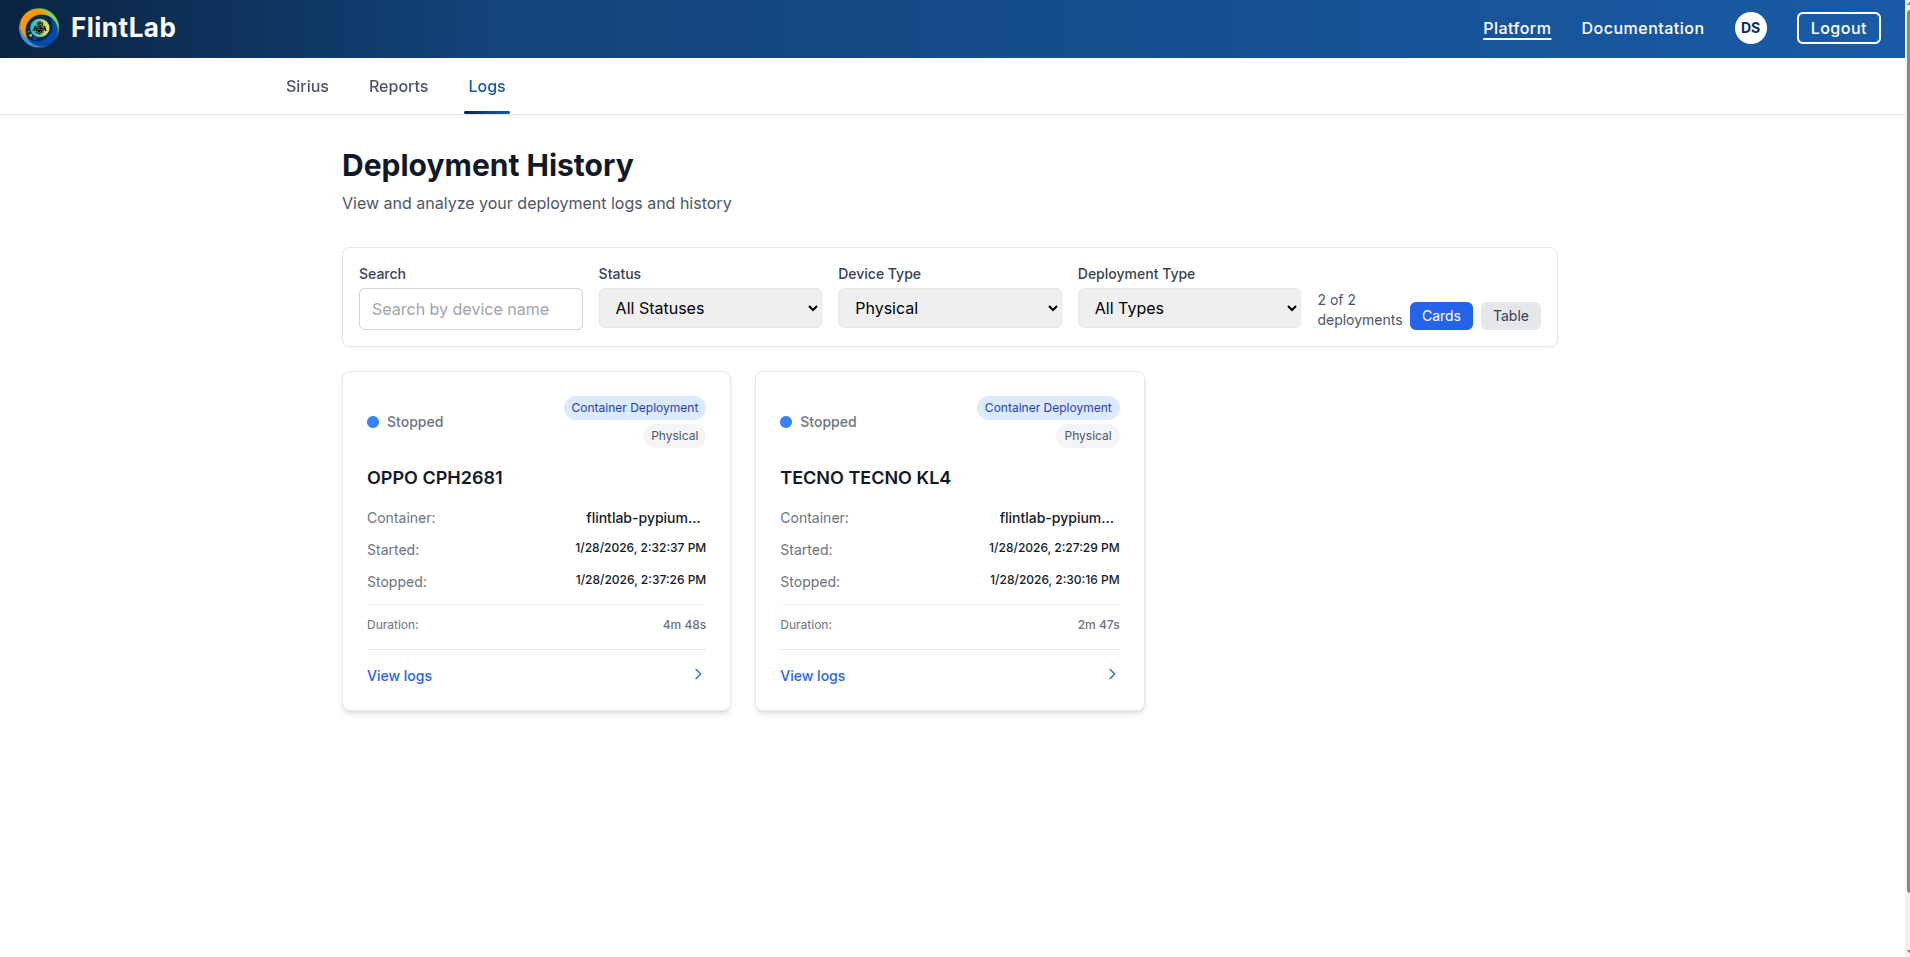
Select Automation Card
Select the desired automation card from the list. The card will be named after the mobile device you selected for the test.
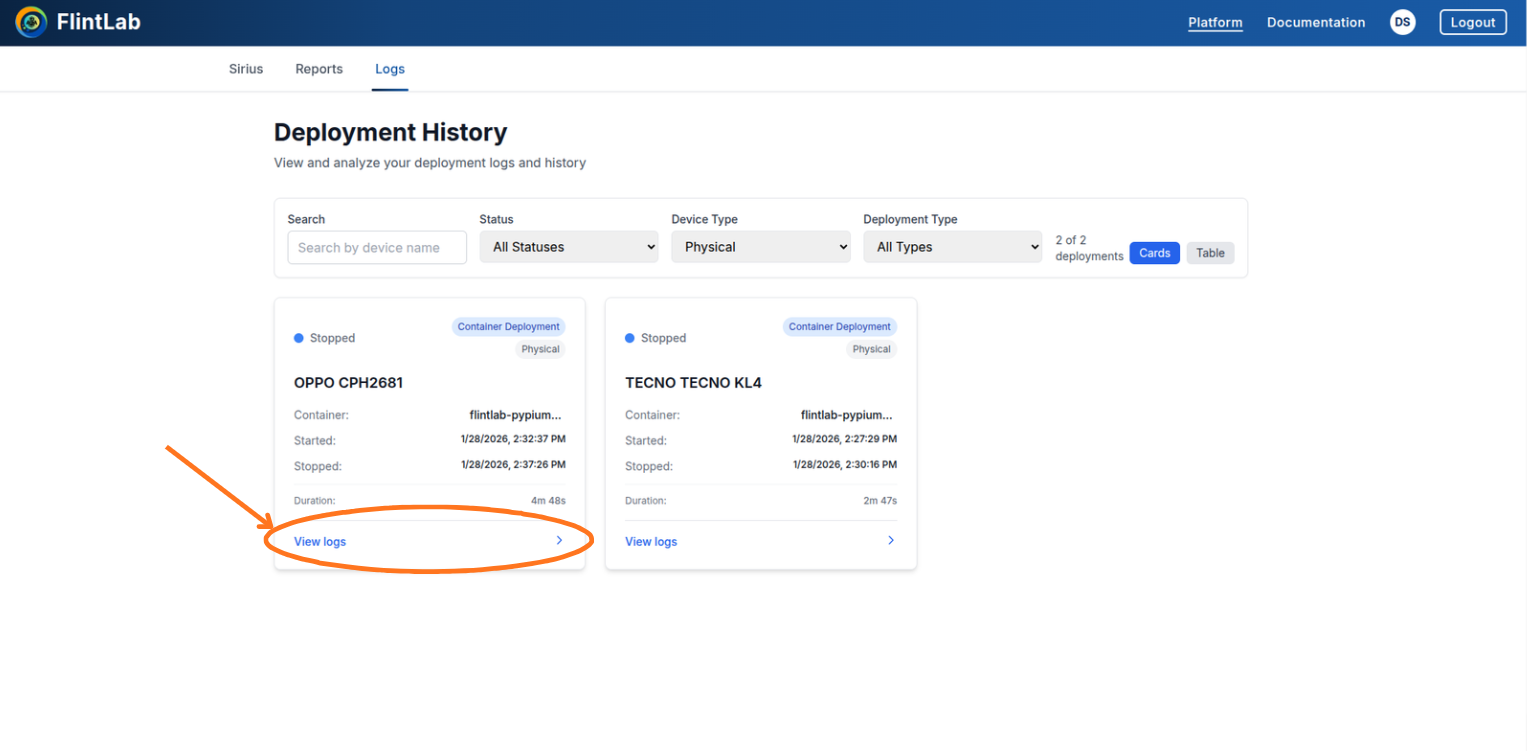
View and Download Logs
Click on 'View Logs' to see the detailed logs, then download them in CSV format.
View Logs
Click on "View Logs" button to open the detailed log viewer for the selected device.
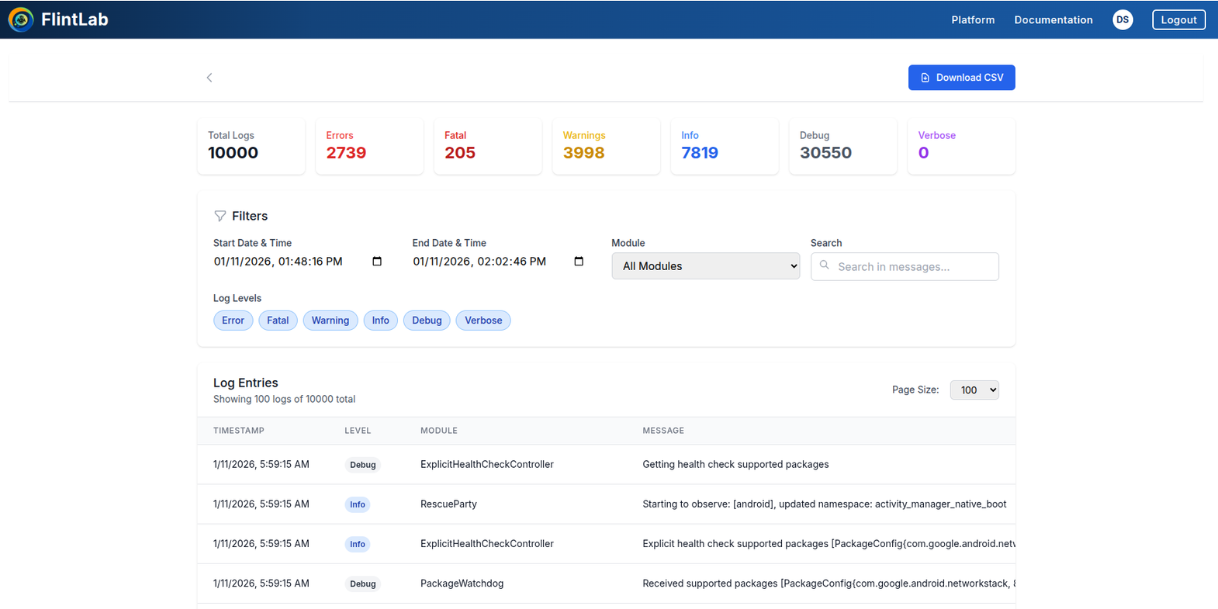
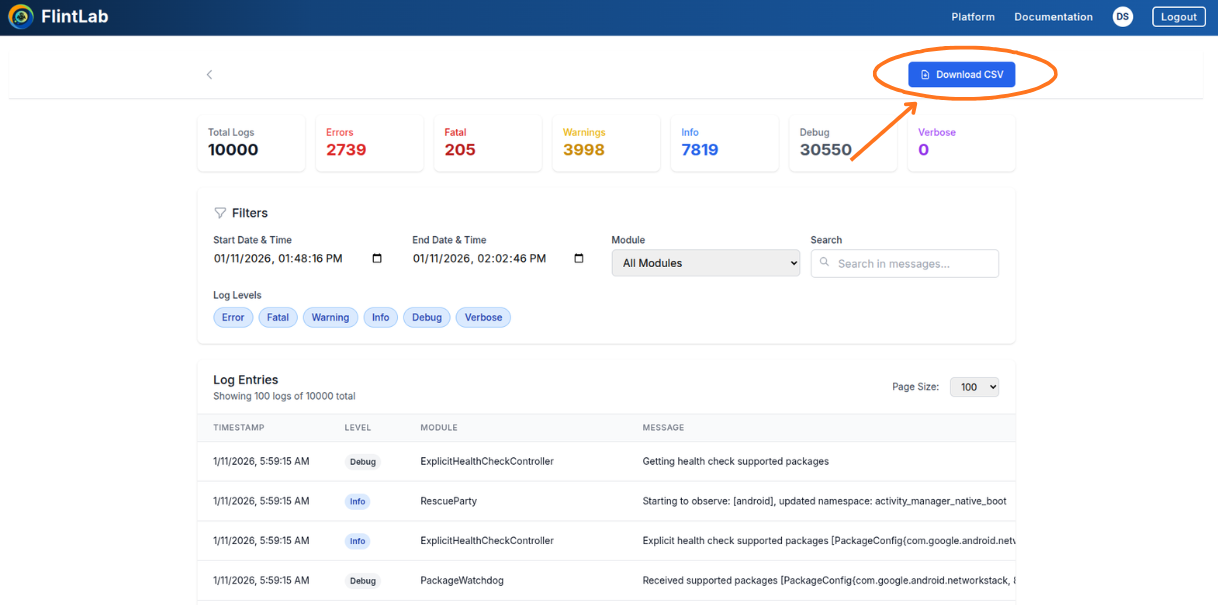
Download CSV
Click on the "Download CSV" button to download device logs into your local system in CSV format.
Simultaneous Downloads
Controls
Complete control over both physical devices and emulators for comprehensive testing workflows
Device Controls
1. Upload APK to Device
Install applications directly onto physical devices
The Upload APK option allows users to install their application directly onto the selected Android device from the Sirius Platform UI. This feature eliminates the need for local ADB commands or manual device connections, enabling faster and simpler app installation for testing.
Click Upload APK Icon
Step 1: Click Upload APK Icon
In the device control panel, find and click the Upload APK icon
Browse and Select File
Step 2: Browse and Select File
Click Browse Files and select your APK file from the file browser
Monitor Installation
Step 3: Monitor Installation
Watch the installation progress bar as the APK installs on the device

Verify Success
Step 4: Verify Success
Look for the green check mark and success message confirming installation
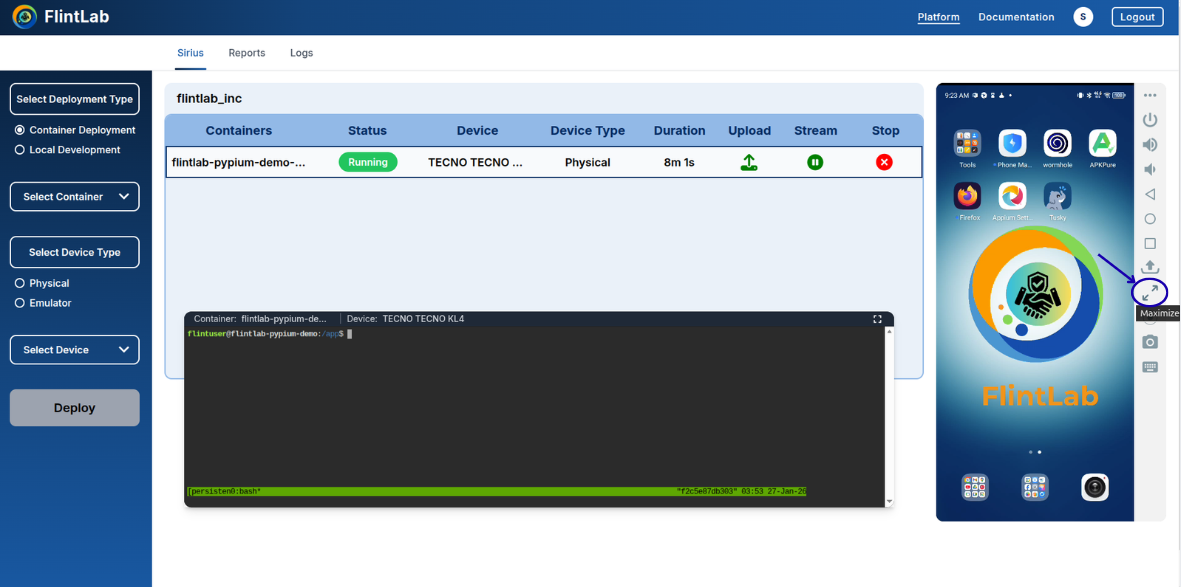
2. Maximize/Minimize
Toggle between full-screen and normal view
The Maximize option allows you to view the selected device in full-screen mode for better visibility and interaction. When enabled, the device stream expands to occupy the entire available screen area.
Usage:
- Click the Maximize icon to expand the device view to full screen
- Click the same icon again to exit full-screen mode
- Perfect for detailed UI inspection and multi-touch testing
Maximized View
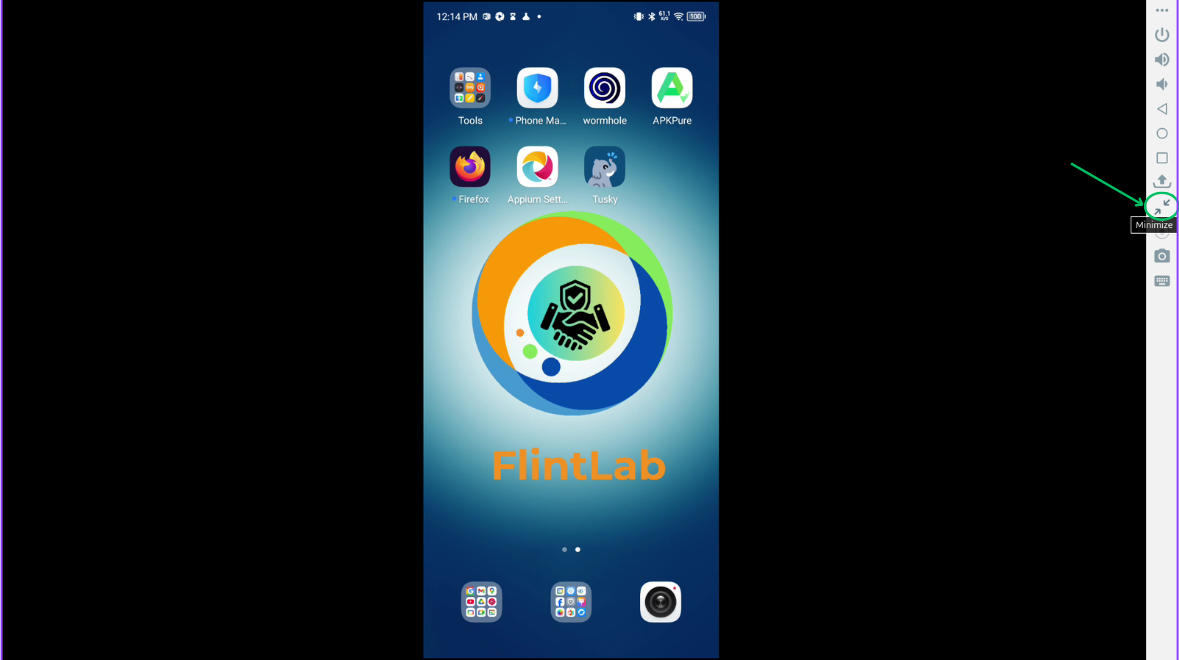
Minimized View
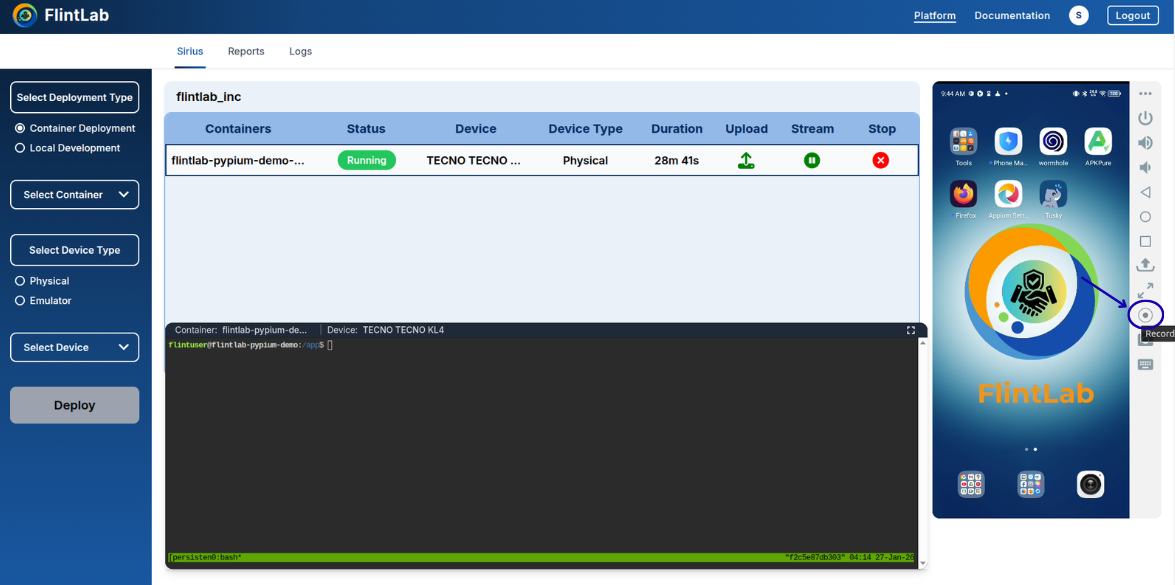
3. Start/Stop Recording
Record device sessions for review and debugging
The Recording option allows you to record your device session for later review, debugging, or sharing with team members.
Steps:
- Click the Record icon from the device control panel
- Icon changes to red indicating active recording
- Click again to stop recording
- Recording saves automatically for download
Recording Active

Recording Stopped
4. Take Screenshot
Capture device screens instantly
Click the Take Screenshot icon to capture the current screen of the device. The screenshot is taken instantly without interrupting the ongoing session.
Use Cases:
- Documentation of test results
- Bug reporting with visual evidence
- UI validation and comparison
- Creating test case illustrations
Screenshot Button
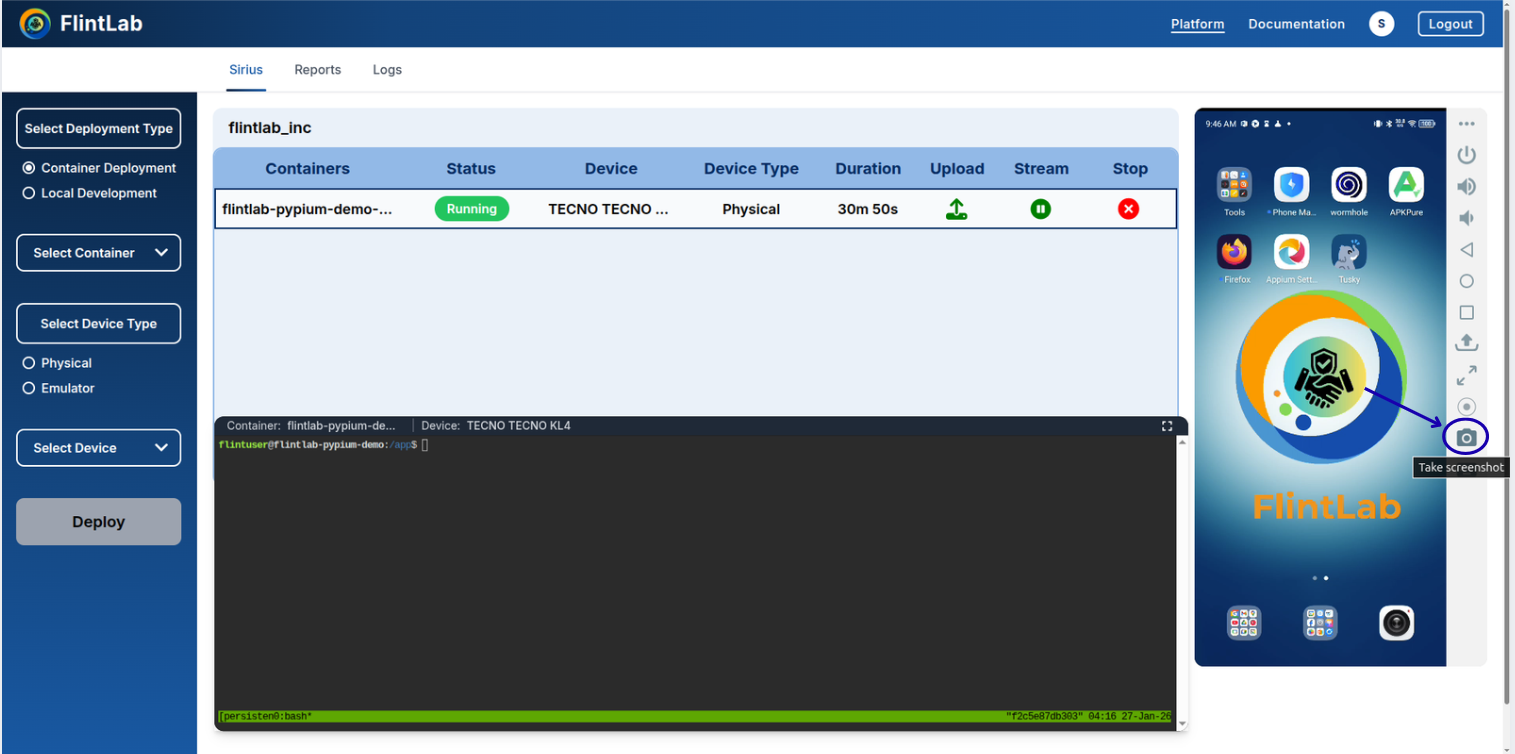
Instant Capture
No delay, no interruption
Auto-save
Saved to Local system
Emulator Controls
Upload APK to Emulator
Install applications on Android emulators
Similar to physical devices, you can upload APK files directly to Android emulators through the FlintLab UI. This allows for quick installation and testing on virtual devices.
Emulator APK Upload Steps:
- Start an emulator session from the device selection
- Click the Upload APK button in emulator controls
- Select your APK file from the file browser
- Wait for the installation to complete
- Verify the app appears in the emulator's app drawer
Emulator APK Upload Interface
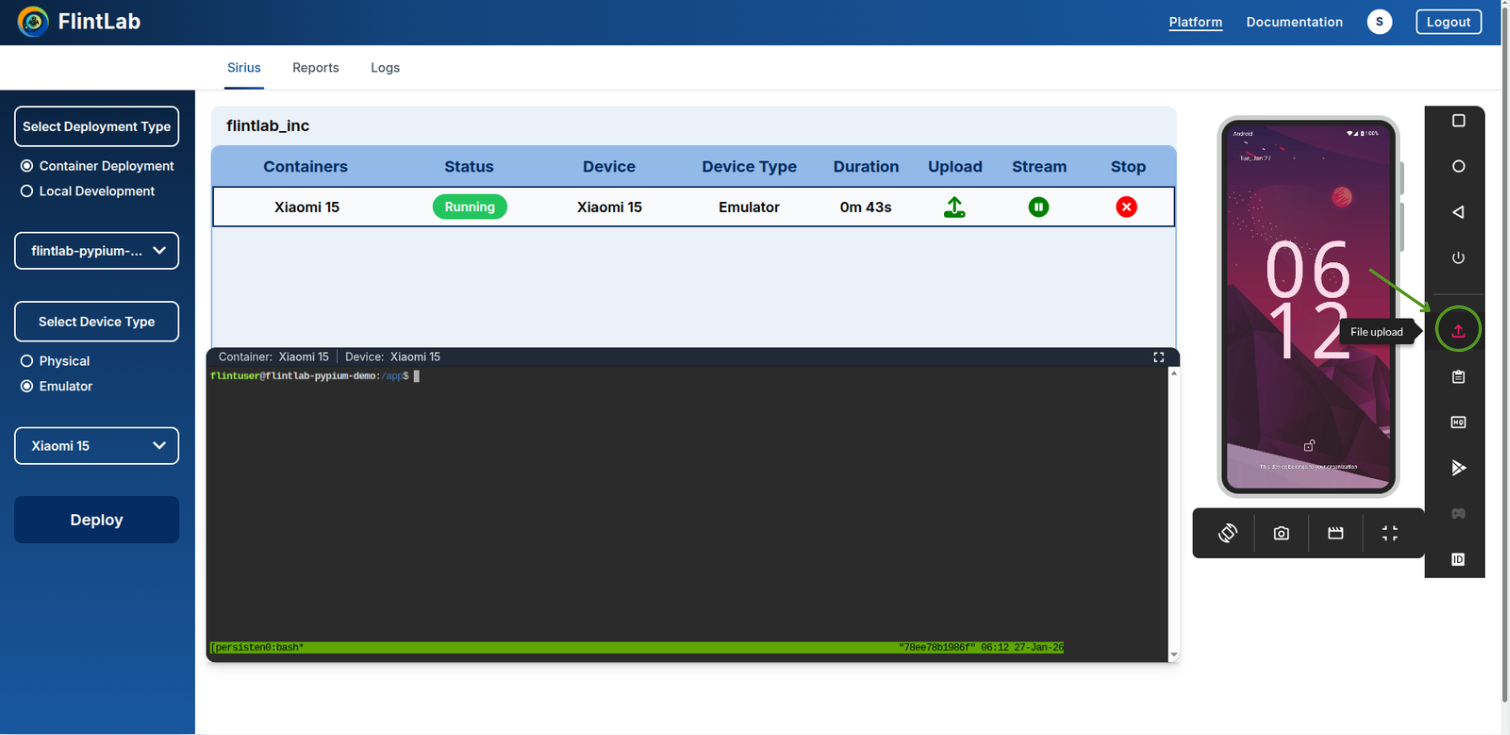
Fast Installation
Typically faster than physical devices
Multiple Versions
Test on different Android versions
Account & Settings
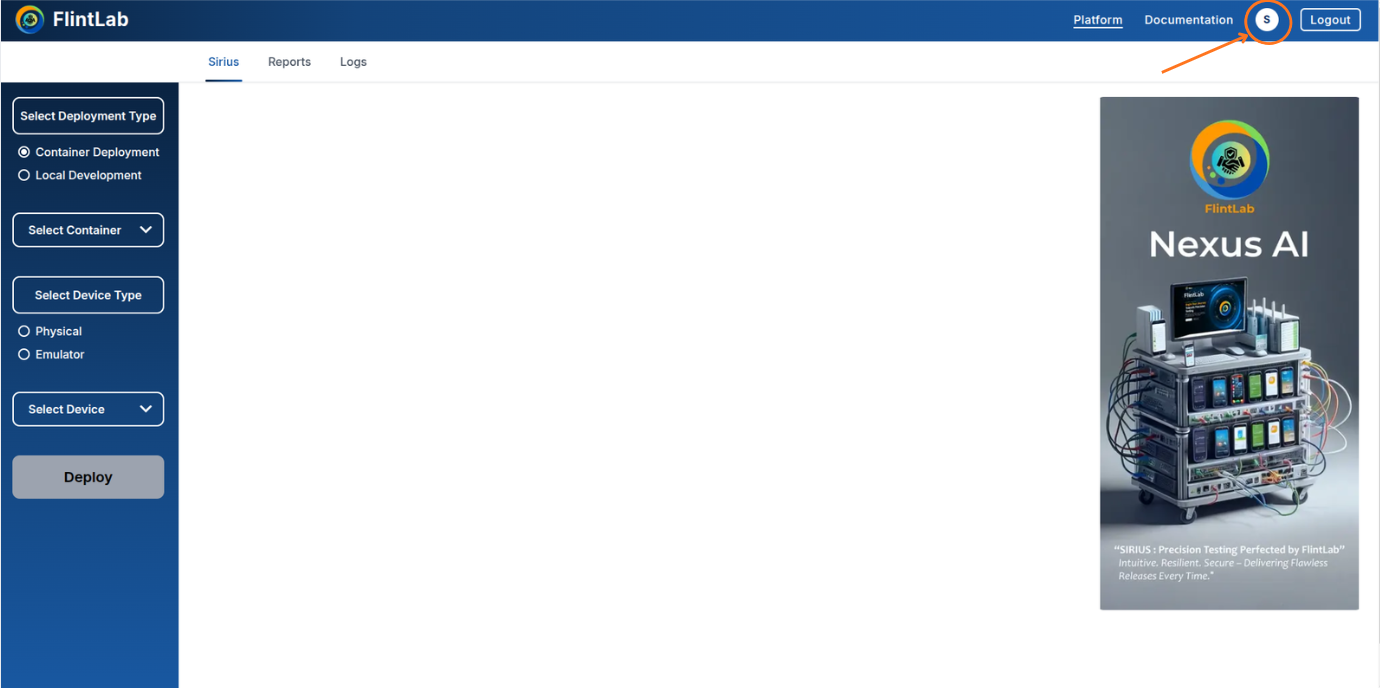
Manage your profile, track usage, configure preferences, and secure your account. Access these settings by clicking on your profile icon in the top navigation bar of the Sirius Platform.
How to Access Account & Settings
- Log into the Sirius Platform
- Click on your profile icon in the top-right corner of the navigation bar
Profile
Personal and account information overview
User Info
John Doe
User
Company Information
Company
FlintLab Inc
user@flintlab.io
Account Details
Role
Administrator
Subscription Plan
Enterprise
Status
ActiveThis section gives a quick overview of the user's identity, organizational affiliation, and account subscription in a structured, easy-to-read layout.
Usage Details
Track and monitor resource consumption
The Usage Details feature allows users to monitor and track resource usage on the Sirius platform.
How to View Usage
Select the Date Range
Choose a Start Date and an End Date for the period you want to review.
Load Usage Data
Click the Load Usage button to retrieve resource usage information for the selected period.
Review the Resource Usage Summary
The platform displays a summary of your resource consumption, including:
- Container Usage: Time spent using containers (shown in minutes and hours)
- Real Device Usage: Time spent using physical devices (shown in minutes and hours)
- Total Usage: Combined time across containers and real devices
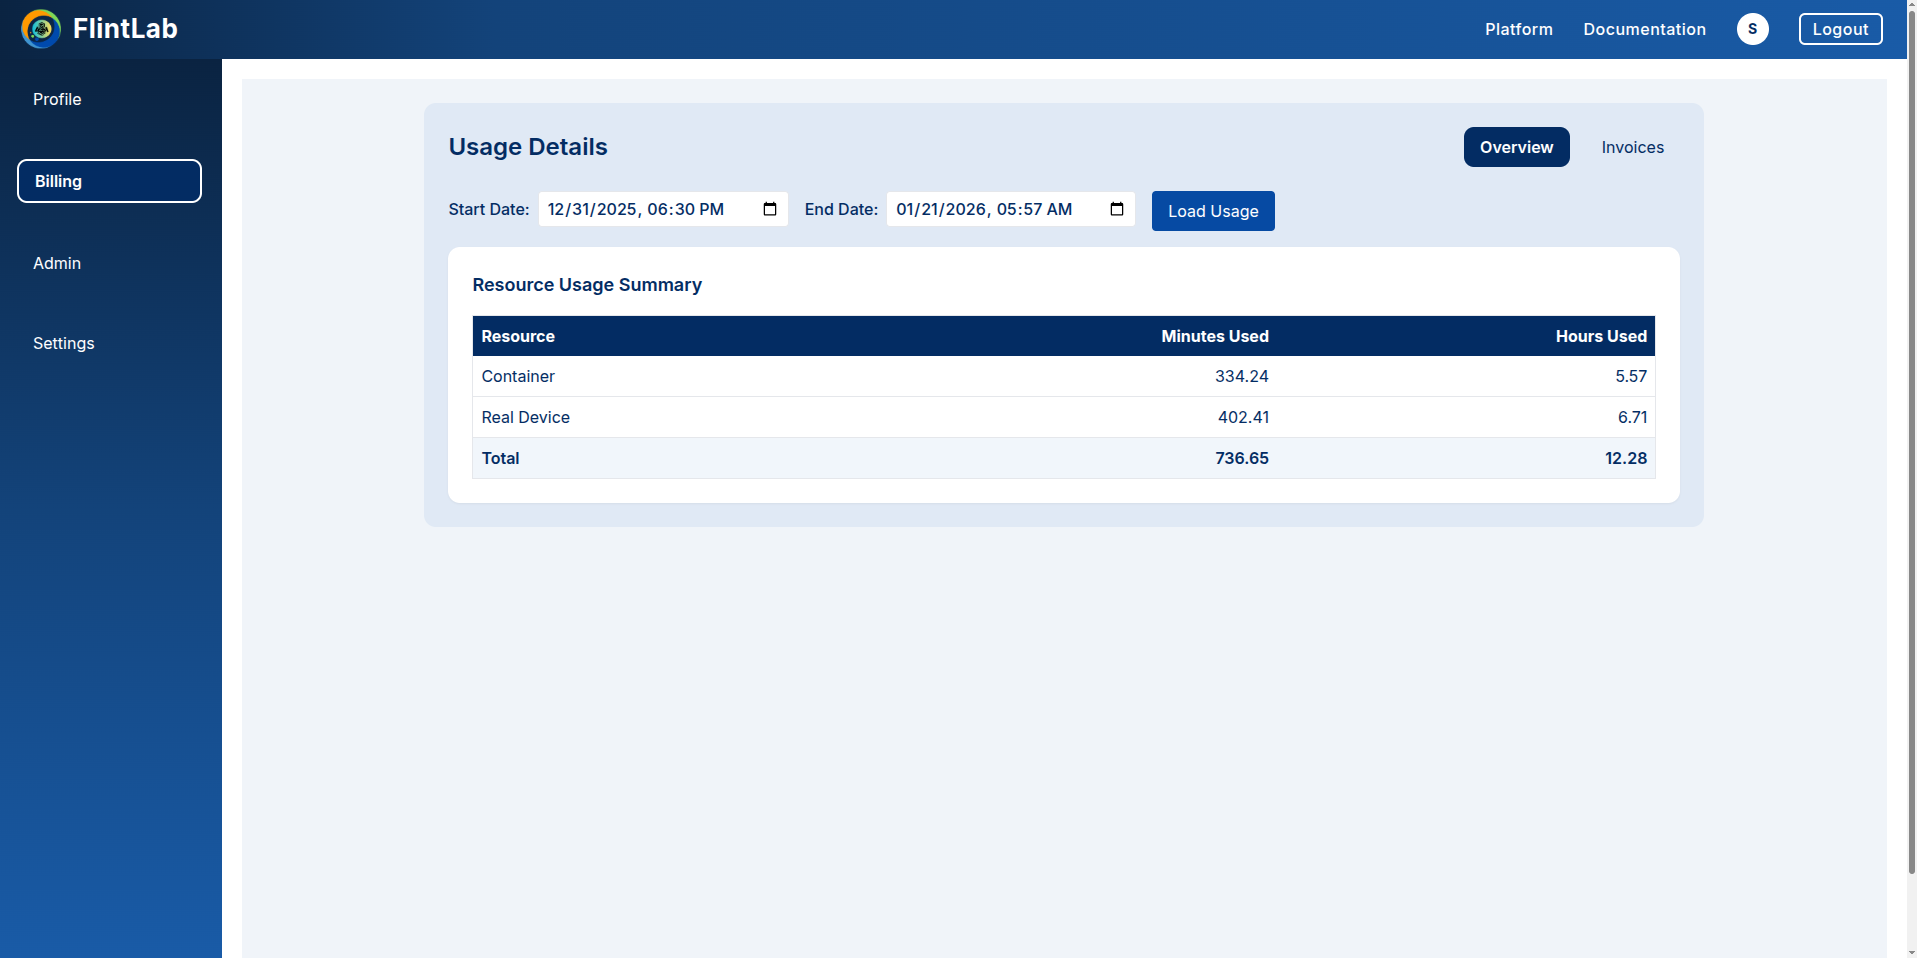
Benefit: This summary helps users track testing time, manage resources efficiently, and optimize test execution on Platform.
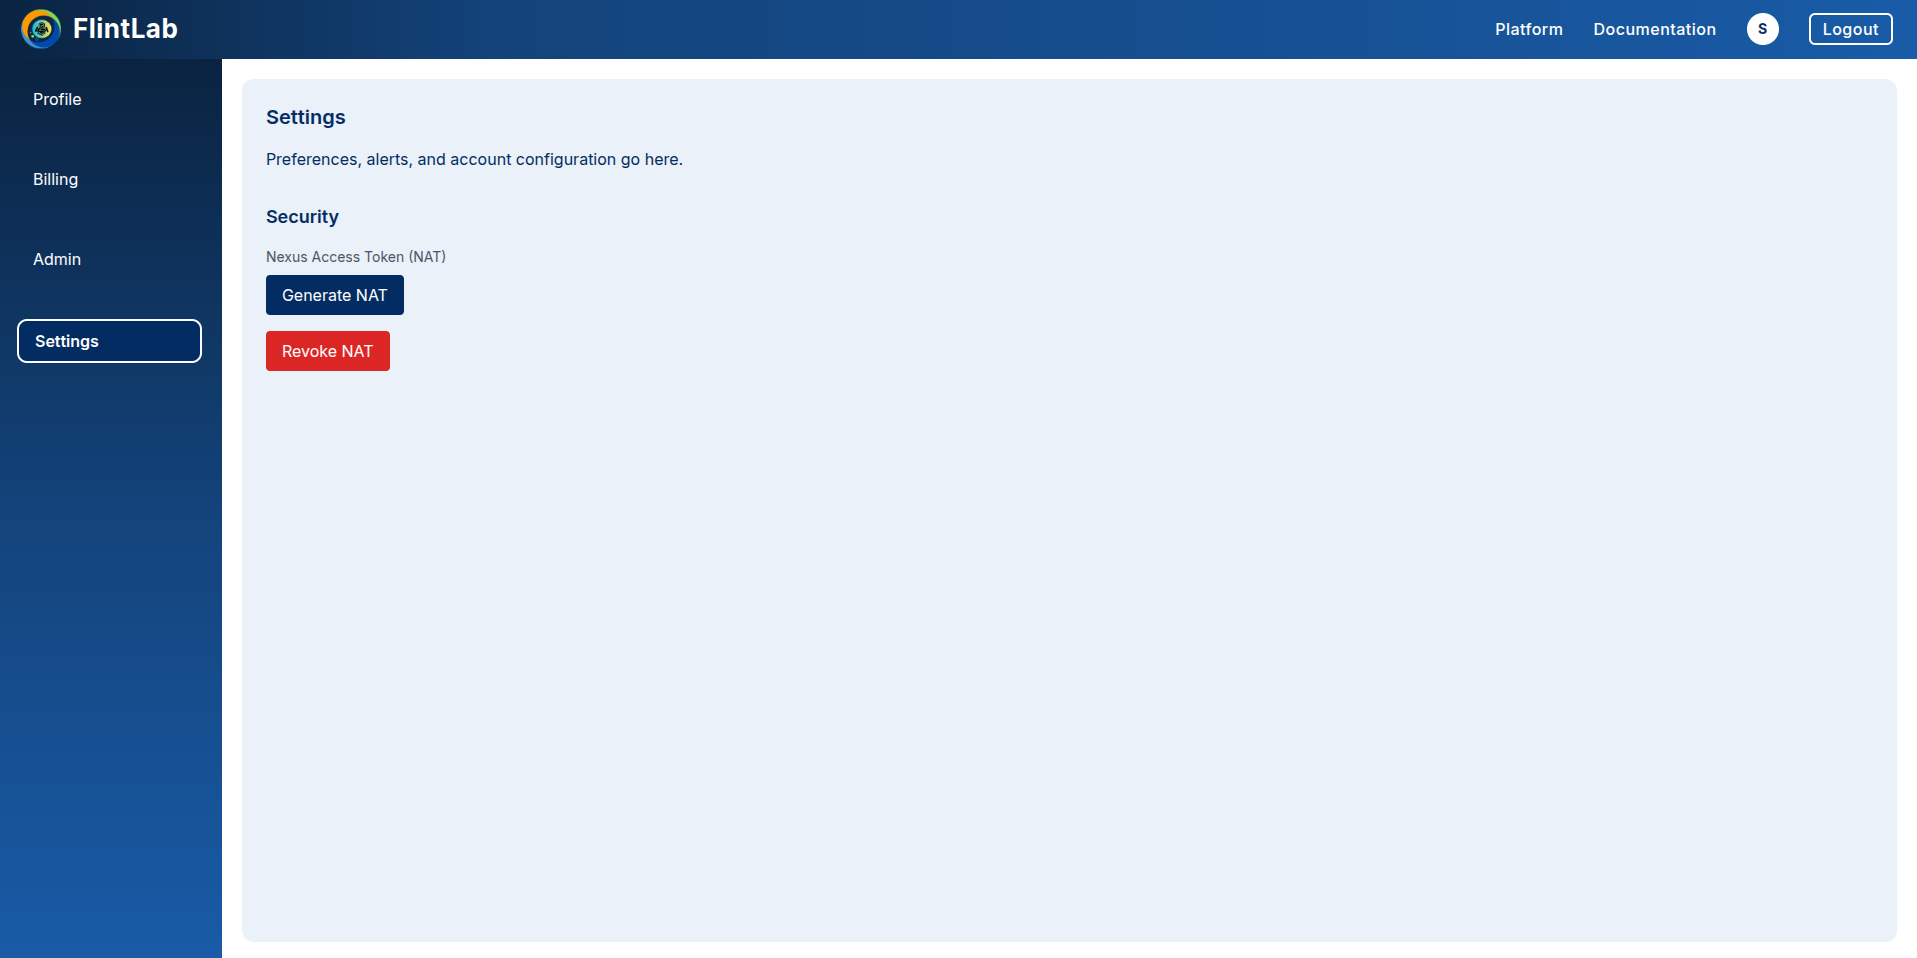
Settings
Manage preferences, alerts, and configurations
The Settings section allows users to manage preferences, alerts, and account configurations.
Security
Manage access tokens and security settings
Users can manage their Nexus Access Token (NAT) from this section to maintain secure access to FlintLab services.
Generate NAT
Create new access token
Click this button to create a new Nexus Access Token for secure access to FlintLab services like FlintAPI and FlintCLI.

Revoke NAT
Invalidate existing token
Click this button to invalidate an existing token, preventing further access using it.

Security Information
Nexus Access Token (NAT)
A secure token used for authenticating API and CLI requests to FlintLab services.
Best Practices
- Please save your Nexus Access Token (NAT) securely on your machine. You won't be able to see it again later.
- Rotate token periodically for enhanced security
- Revoke tokens immediately if compromised
Security Note: This section ensures users can maintain secure and controlled access to their FlintLab account and resources.
Troubleshooting Guide
Common issues users may encounter while using the Sirius Platform UI and recommended steps to resolve them.
Upload APK failed. How can I fix this?
Check that the APK file is valid and supported.
Retry the upload after refreshing the page.
If the issue continues, ensure the device session is active before uploading.
Supported formats: APK, IPA files only
Why don't I see test reports after execution?
Reports are generated only after the session completes successfully.
Navigate to the Reports tab and ensure the correct deployment is selected.
If reports are not generated, confirm that your test scripts include report generation logic.
I cannot upload automation scripts to the container. What should I check?
Ensure the container is in a Running state before uploading files.
Also verify that the file type is supported.
Confirm the upload completed successfully (green check mark).
Look for the green check mark icon after upload completion
Why does the session stop unexpectedly?
The session may have reached its time limit.
An execution issue may have occurred.
Start a new session and redeploy the container.
Tip: Check session expiration warnings before they occur to prevent unexpected stops
Why is the emulator taking a long time to load?
Emulators may take a few minutes to initialize.
Please wait for a short period during startup.
Avoid refreshing the page while the emulator is loading.
Physical Devices
Typically ready in seconds
Emulators
May take 1-2 minutes to load
Frequently Asked Questions
Quick answers to common questions about using the Sirius Platform UI.
Log in to the FlintLab platform and navigate to the Sirius Platform UI. Select the deployment type, choose a device, and click Deploy to start a session.
Sirius Secure Workspace
Used for automated testing, where tests run inside a test-execution container with full isolation and reproducibility.
Sirius Device Session
Intended for manual and exploratory testing, allowing direct interaction with the device through the browser.
No installation required!
All testing activities can be performed directly from the browser without installing local SDKs, drivers, or automation tools.
- Click on the
Upload APKbutton in the control panel - Drag & drop your APK file or browse to select it
- The app will automatically install and appear on the device
Yes! You have full interactive capabilities:
For automation runs, comprehensive reports are available in the Reports tab in the navigation bar. You can view or download individual reports or download all reports at once.
Navigate to the Logs tab, select the relevant automation card, and click View Logs. Click on Download CSV. Logs can be downloaded as a CSV file.
Yes, parallel execution is fully supported!
The platform supports parallel execution, allowing multiple test-execution containers to run simultaneously on different devices.
Session Expiration Warning
Timely Notifications
You'll receive an expiration warning when there are 2 minutes remaining on your session.
Extend Session
When notified, you can extend the session duration by selecting additional minutes (e.g., 5-300 minutes as shown).
Example
Click the Stop icon in the session or container row. This stops execution and releases the device and resources.
Yes. Depending on availability, you can select either physical devices or emulators when starting a session.